
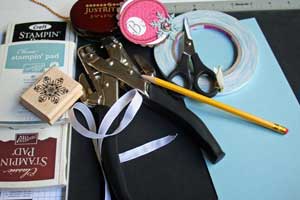
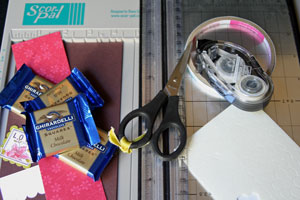
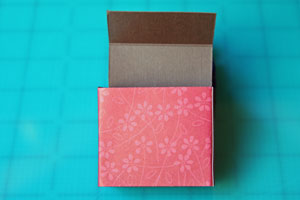
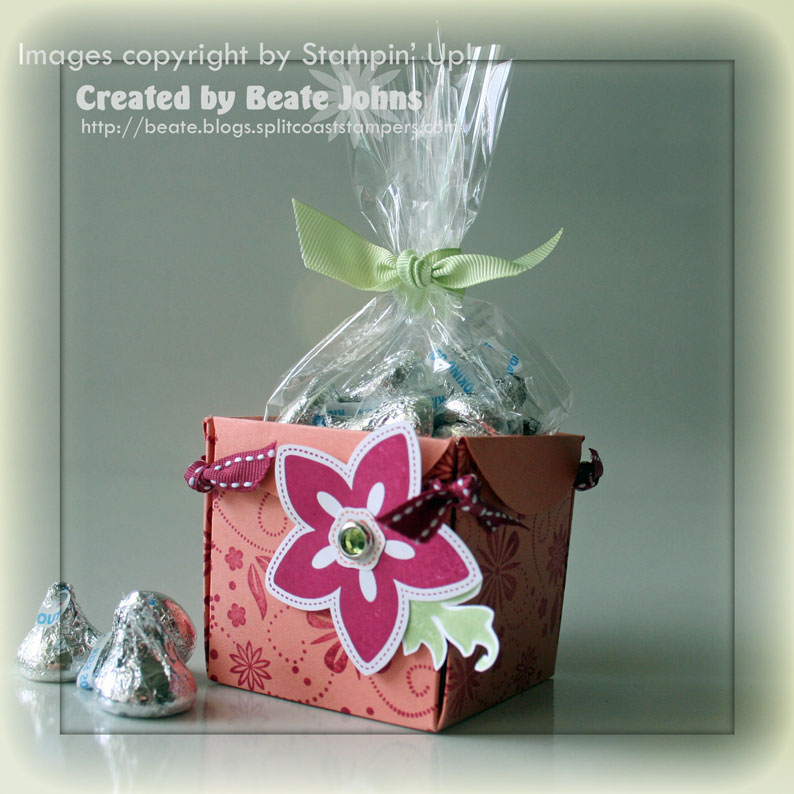
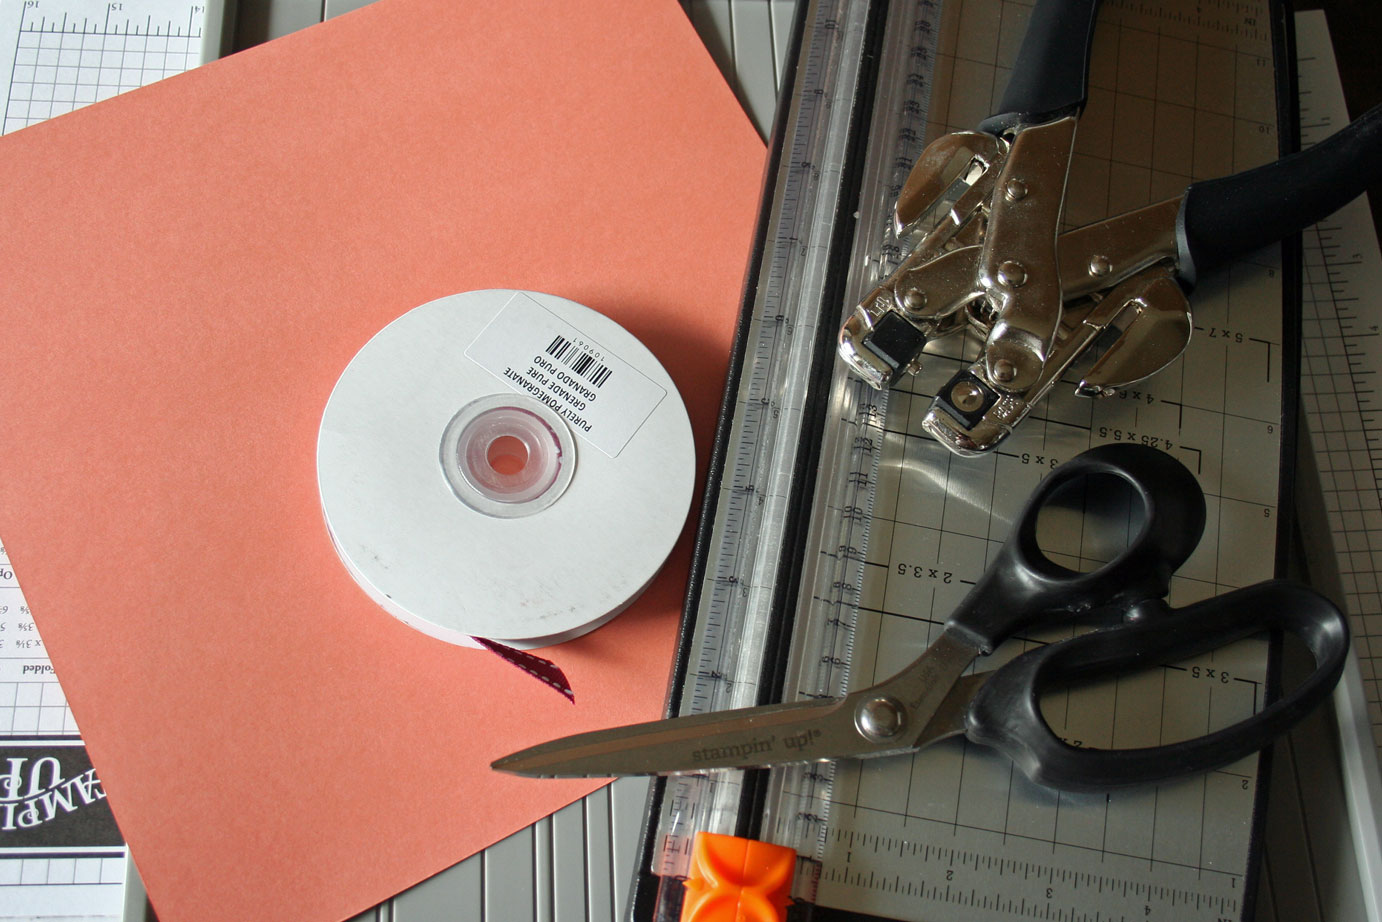
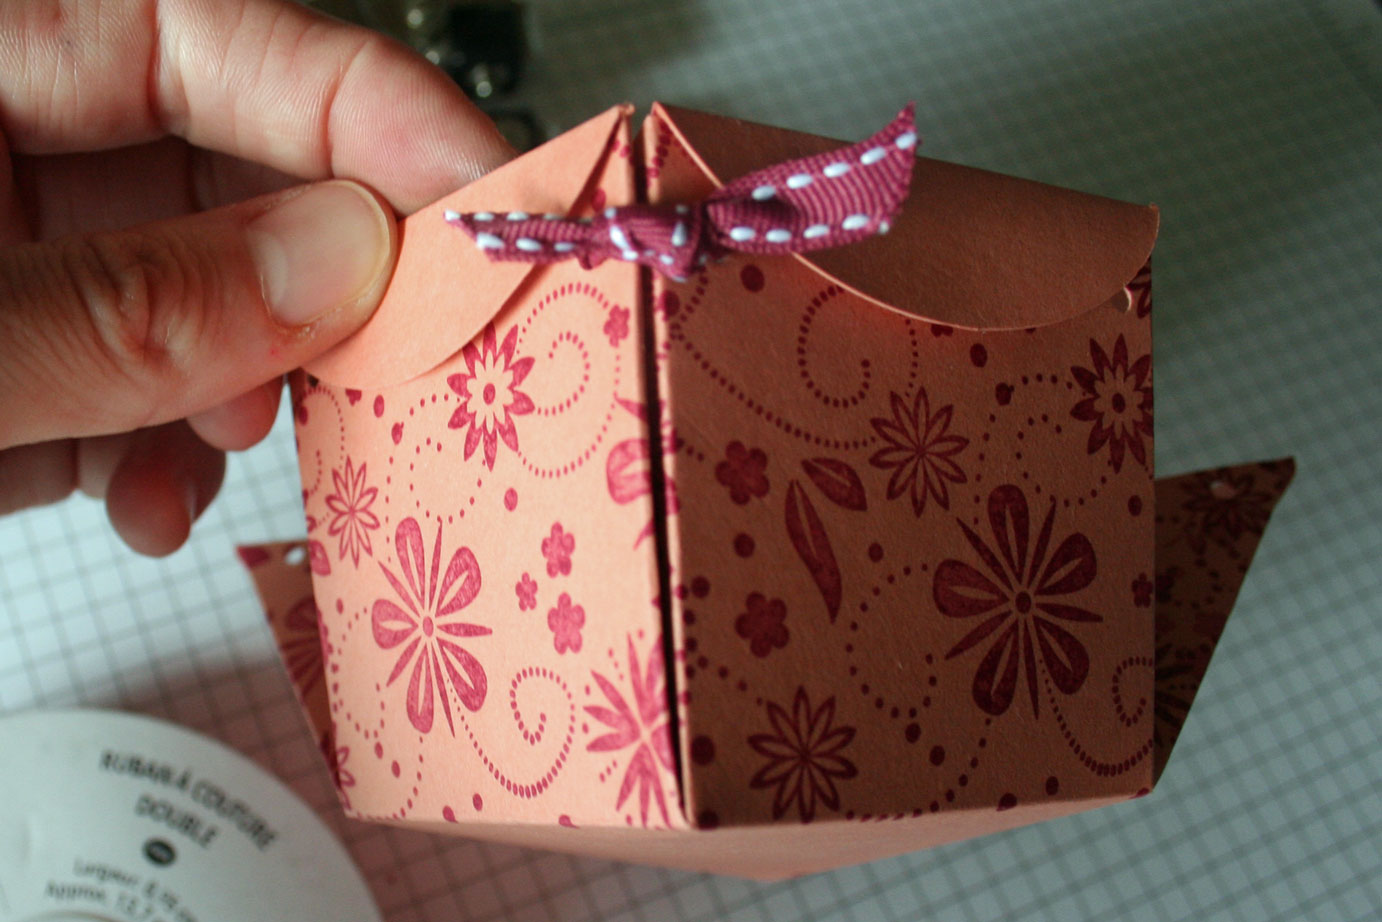
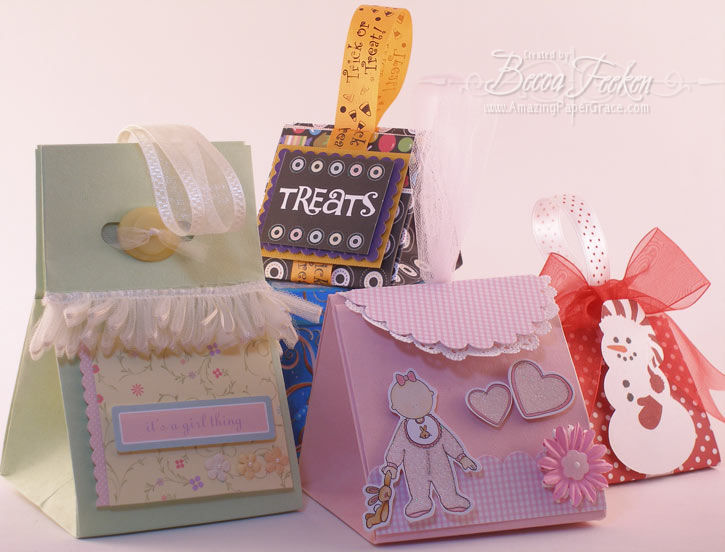
Supplies
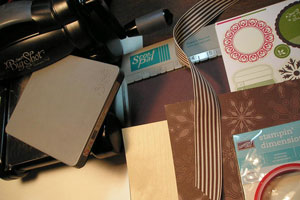
- Two 3 3/4" x 5" pieces of Wood Sheets or cardstock
- Two 3 3/4" x 5" pieces of Patterned Paper (if you use Wood Sheets)
- One 5 1/2" x 8" piece of cardstock
- Scor-Pal™, or other scoring tool
- Sticky Strip™ tape or other strong adhesive
- Big Shot™, or other die cut machine
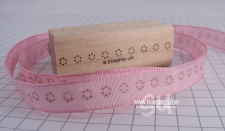
- Top Note Die
- Scissors
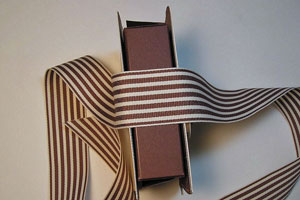
- Ribbon, approx. 24"
- SU Christmas Jingle Simply Scrappin’ kit (or your choice of stamps/accessories) to decorate front of box.
Step-by-Step
-
Step 1
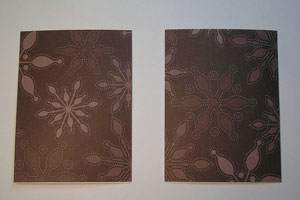
Attach your 3 3/4" x 5" piece of patterned paper to back of wood sheets.
If you use cardstock, you do not need to do this step.
-
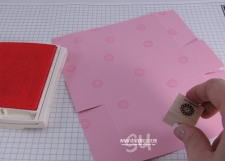
Step 2
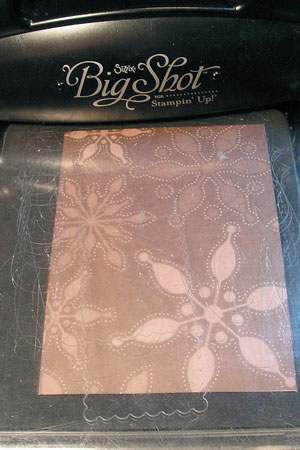
Lay piece on Top Note die with wood sheet side facing down, lining up the long side just inside of the perforation marks.

-
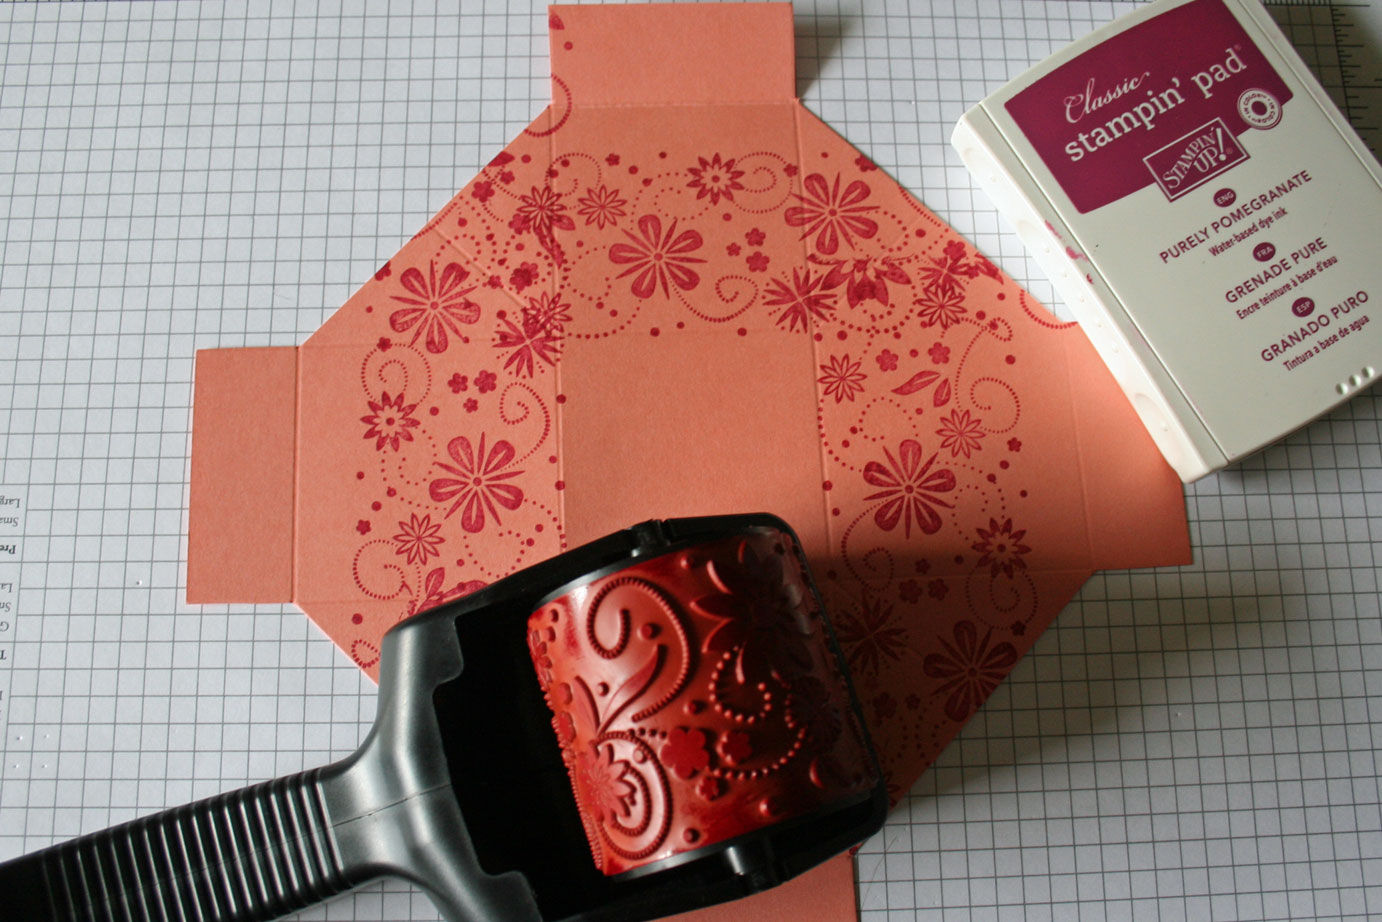
Run through the Big Shot™ and decorate as you wish.
Note:
You can run both sheets through at once, but I did them separately to get the best definition of the “perforation marks” on the box.
-
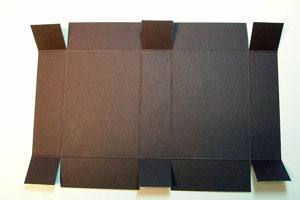
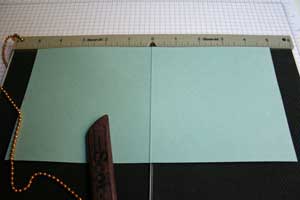
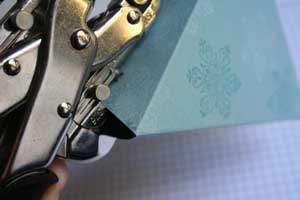
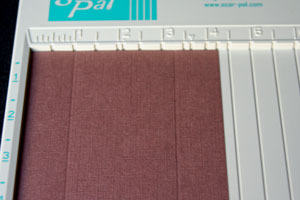
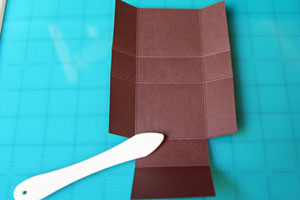
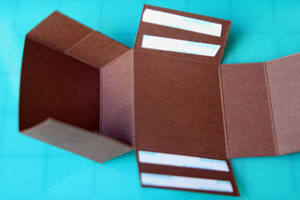
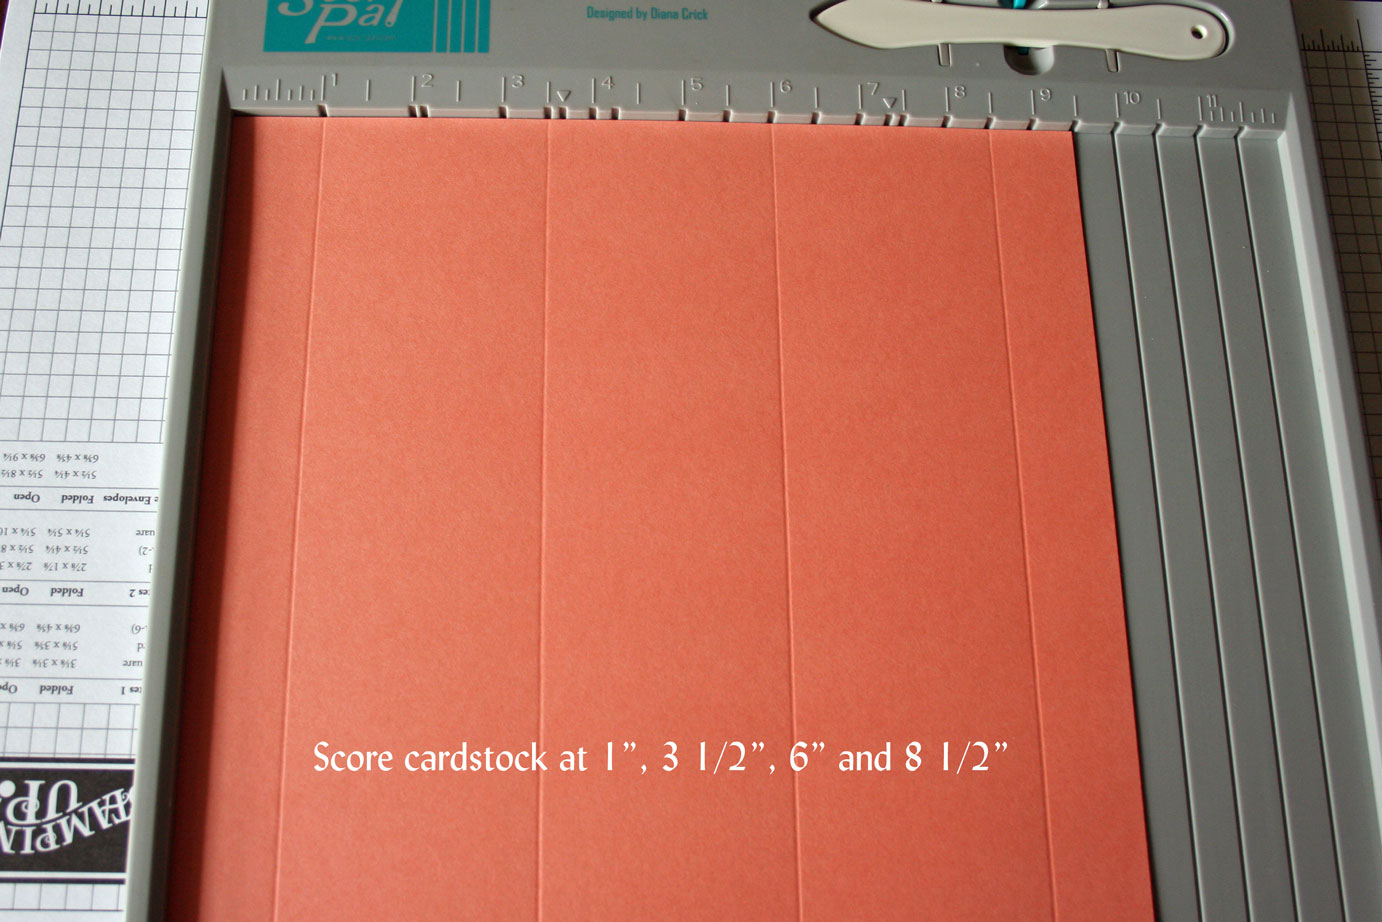
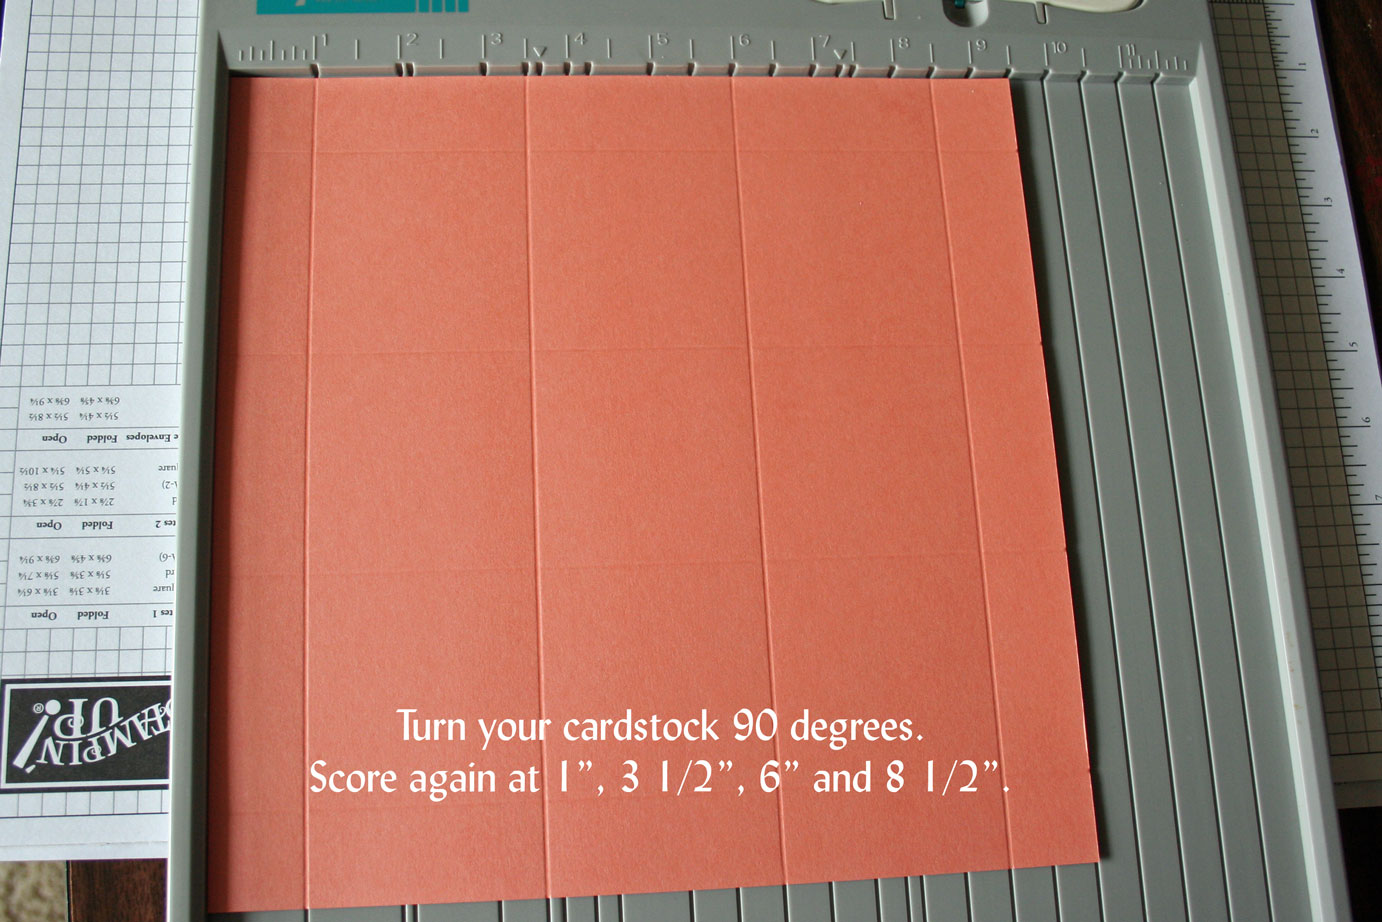
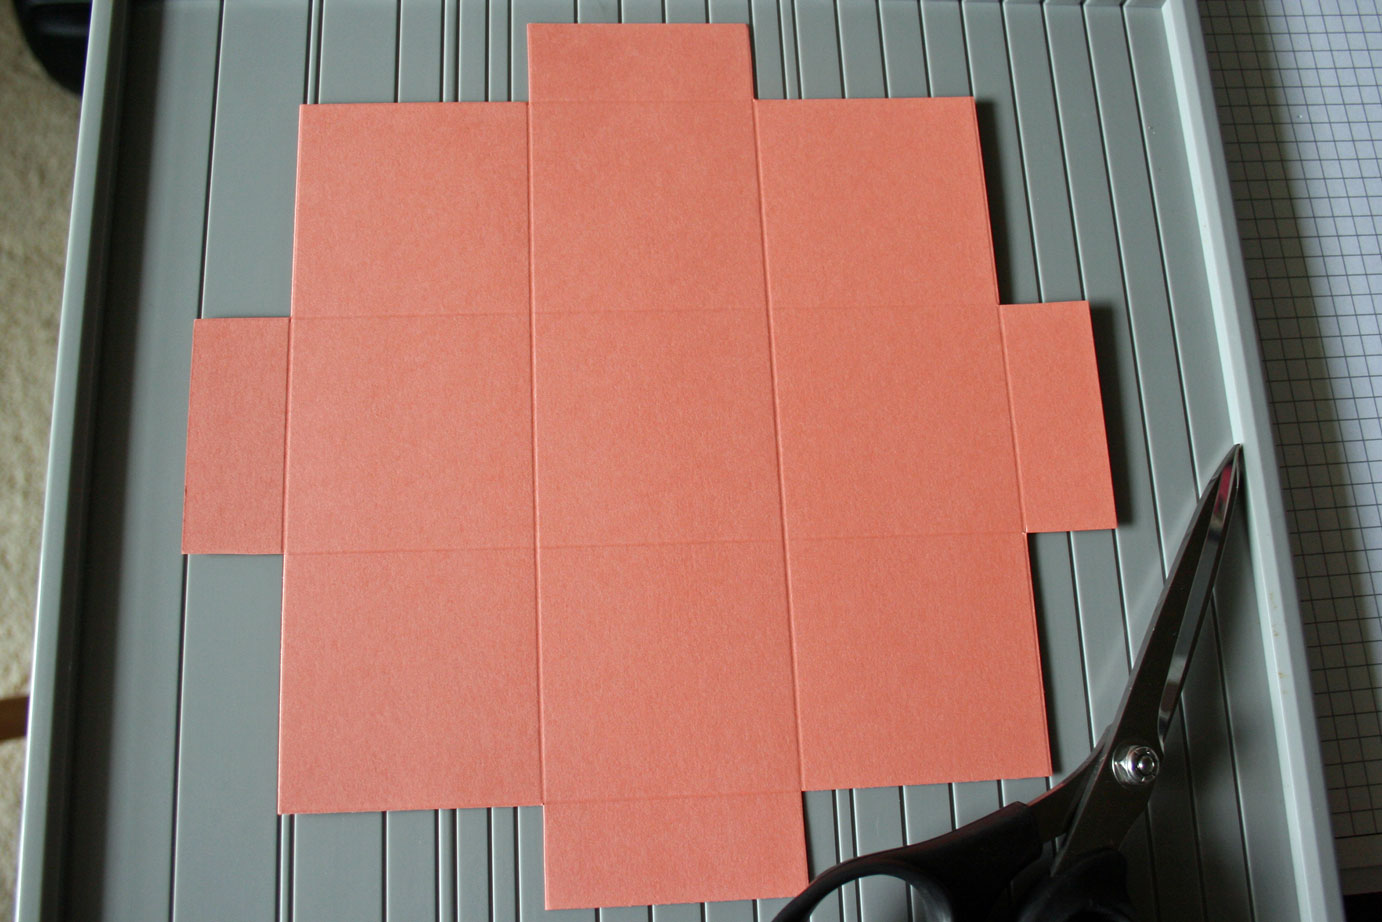
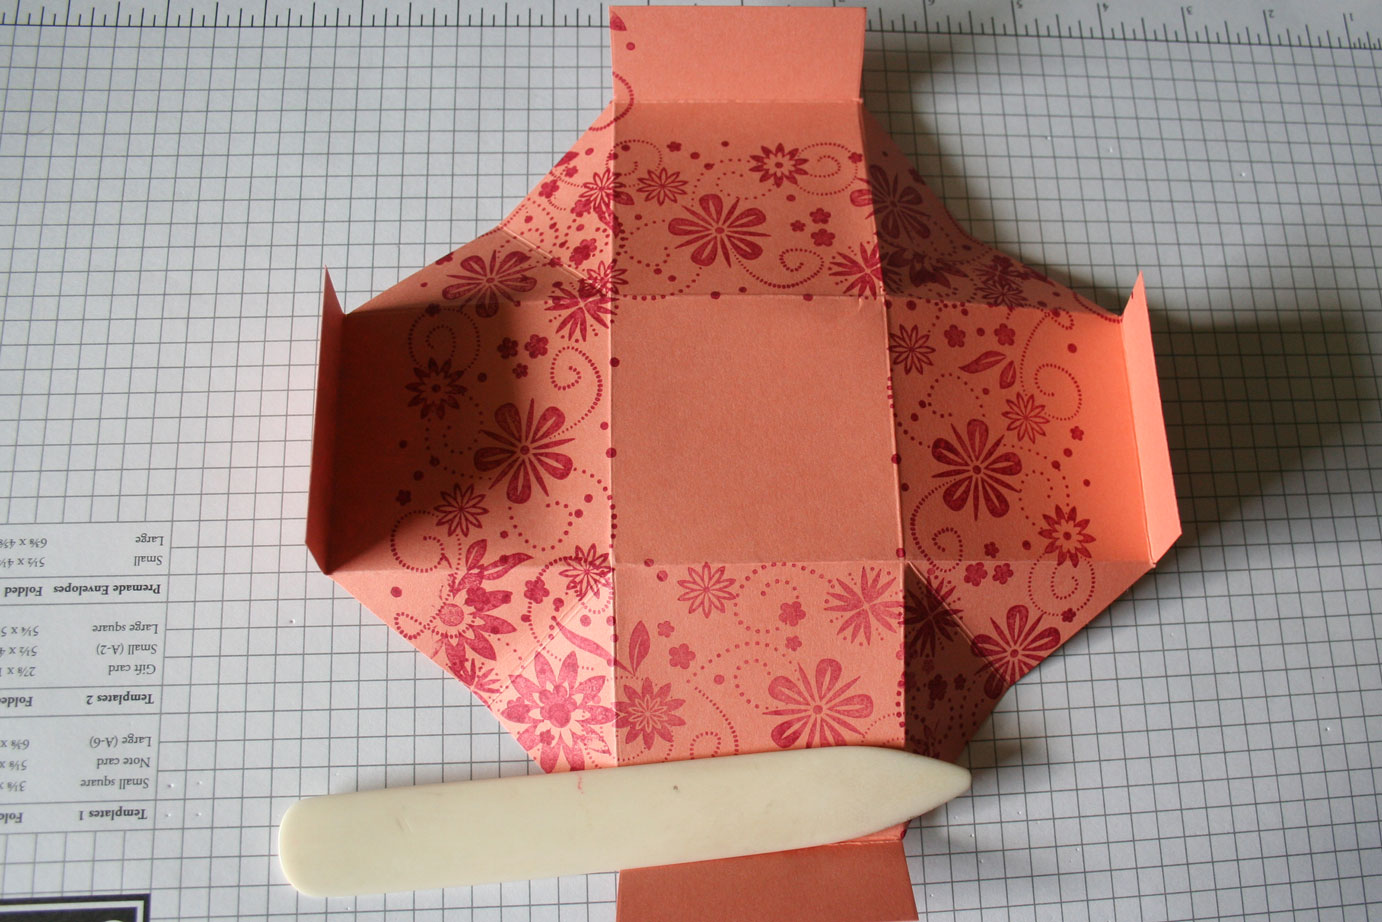
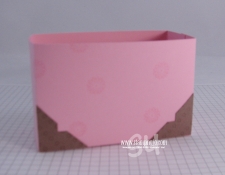
Step 3
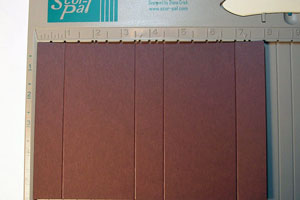
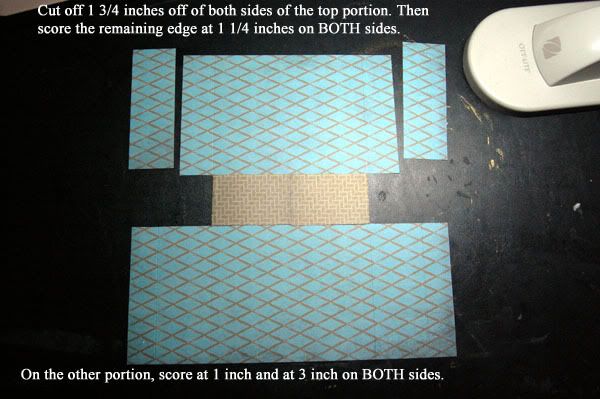
For the inside box piece, score your 5 1/2" x 8" piece of cardstock on its long side at 1", 3 1/2", 4 1/2", and 7".
Thank you to Jen del Muro for this “pizza box” pattern!
-
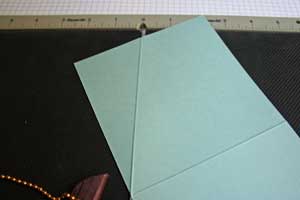
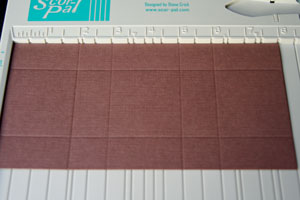
Step 4
Turn cardstock piece and score short side at 1" and 4 ½".

-
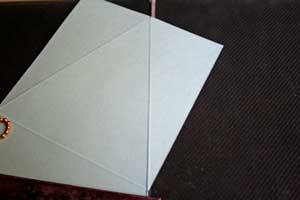
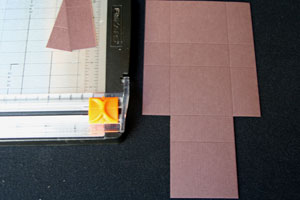
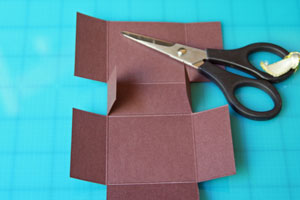
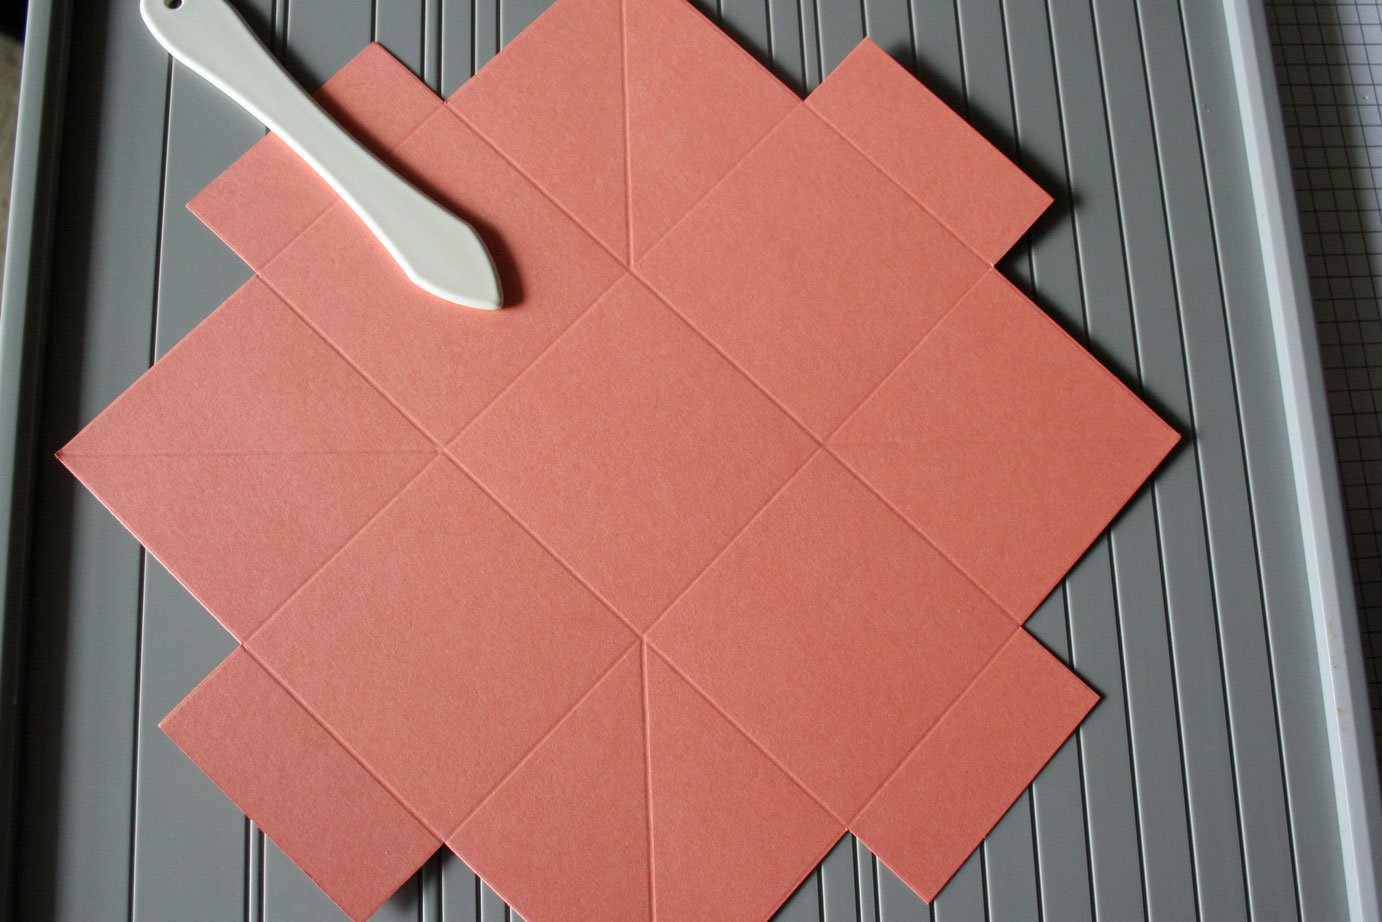
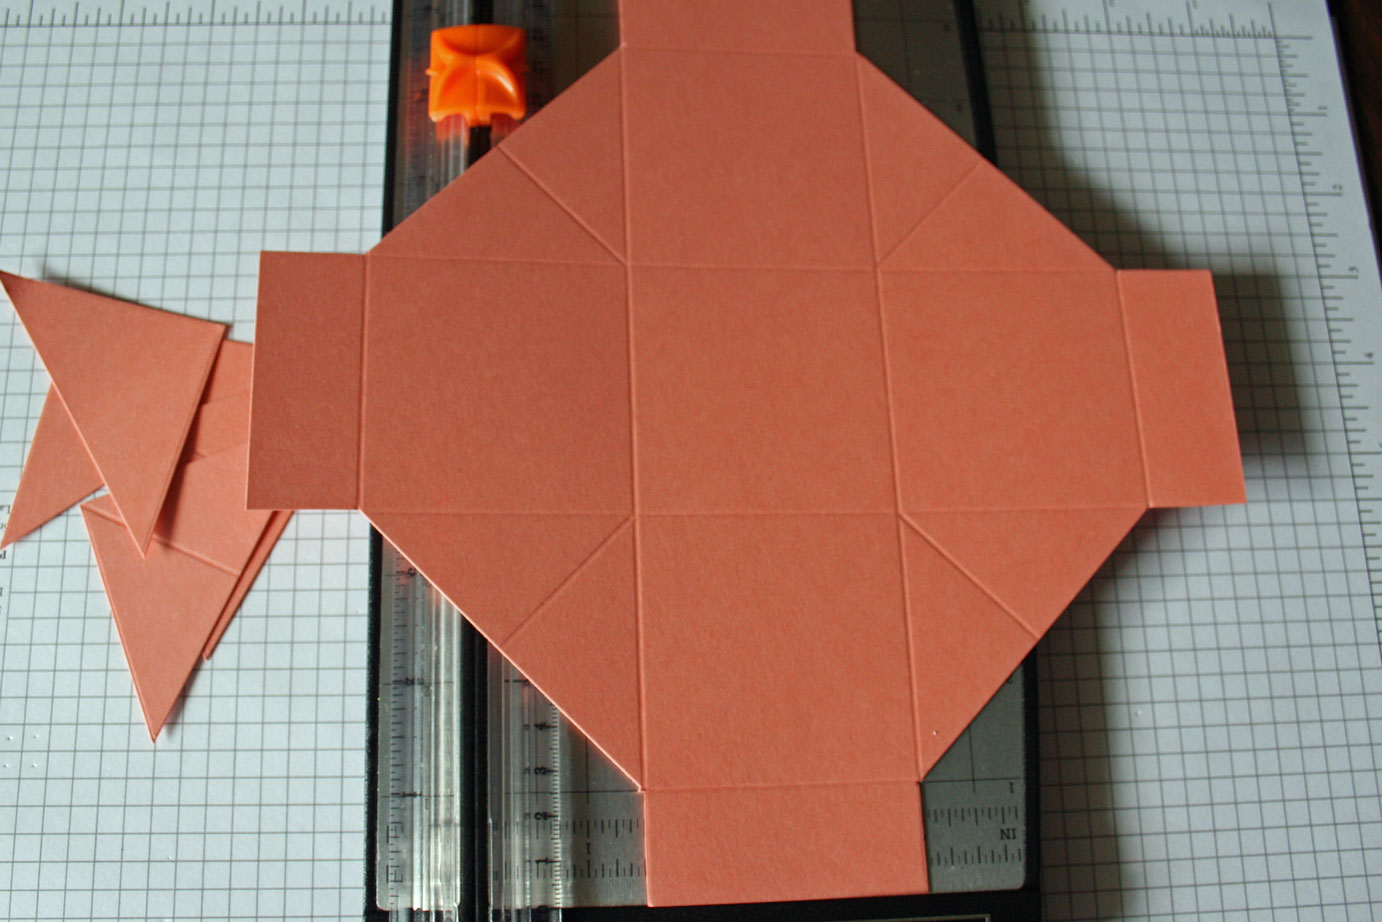
Step 5
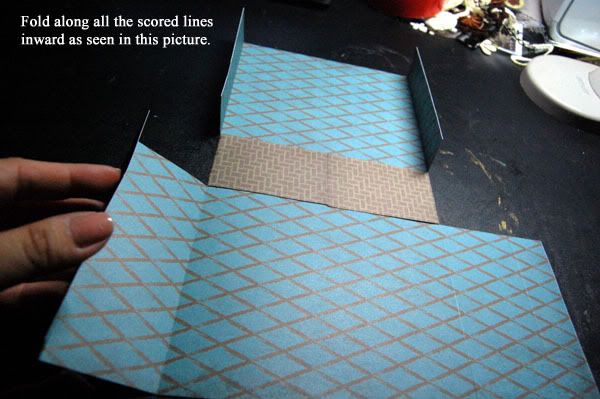
Cut scored lines as shown, up to the 1" score line to make the box tabs.
-
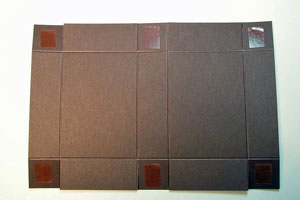
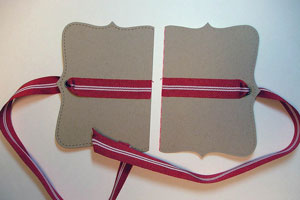
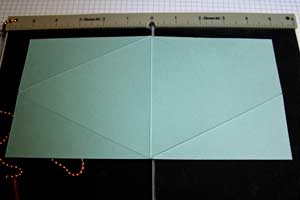
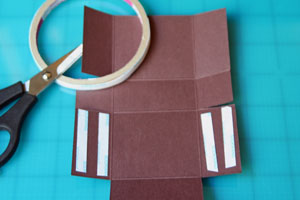
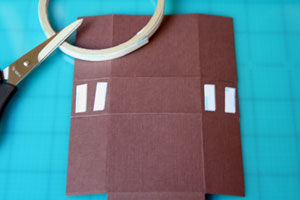
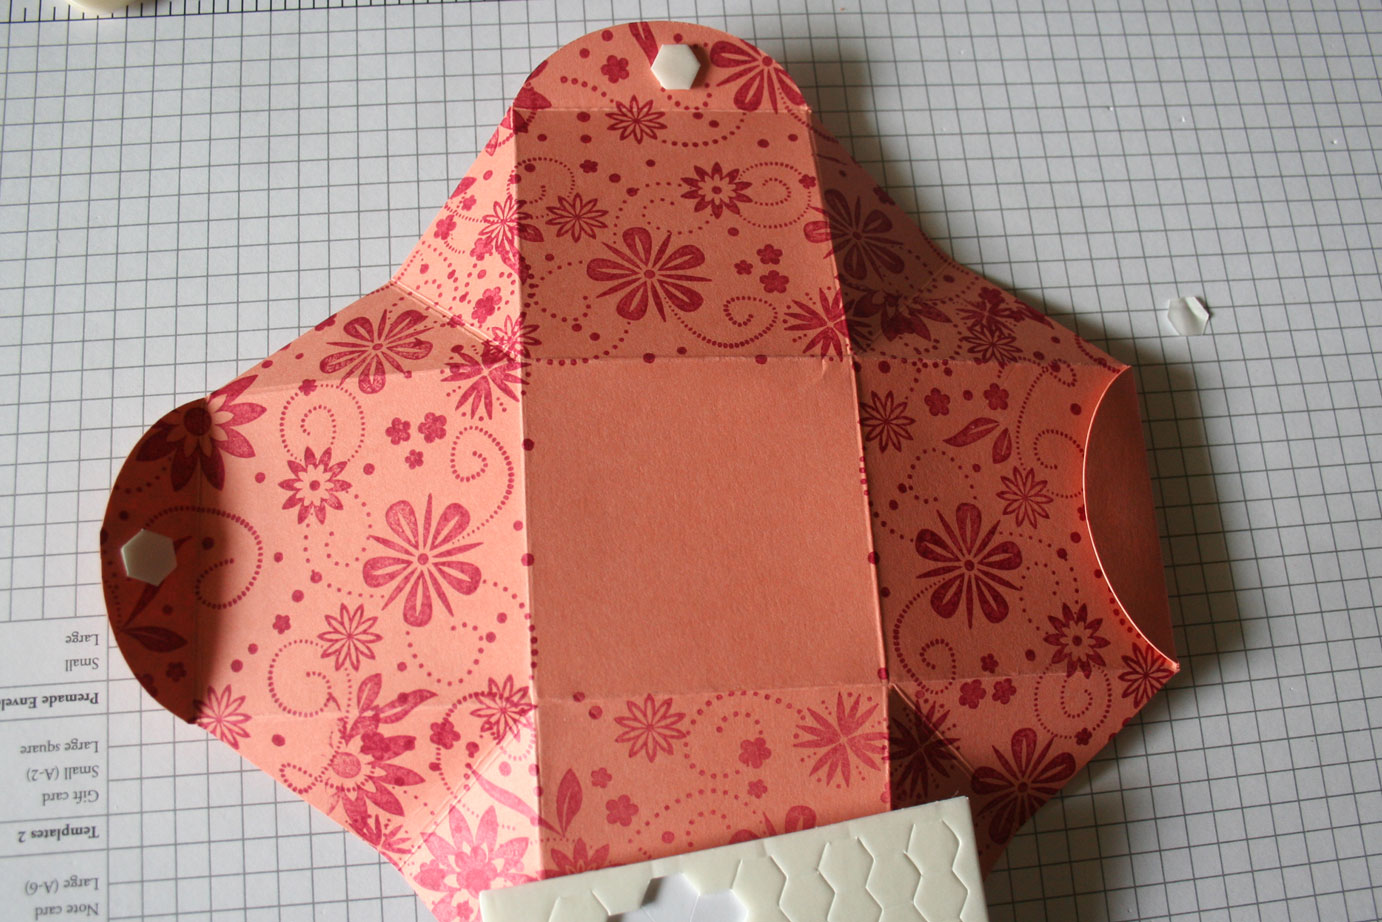
Step 6
Turn the box over and apply Sticky Strip to the right side of the tabs, as shown.
-
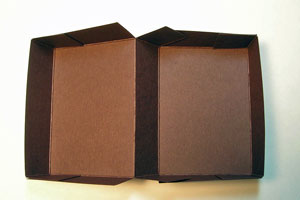
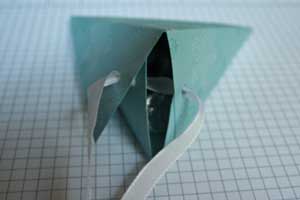
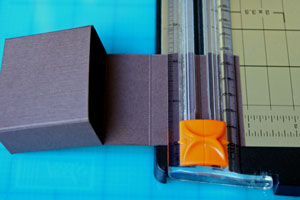
Step 7
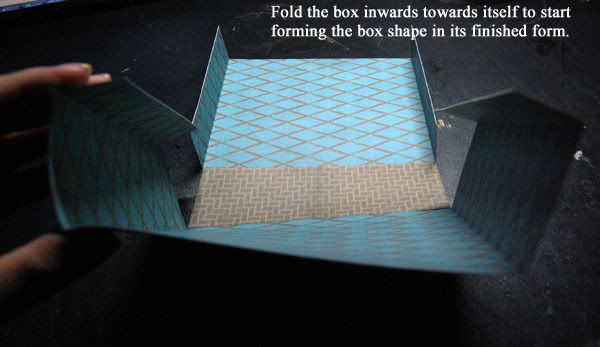
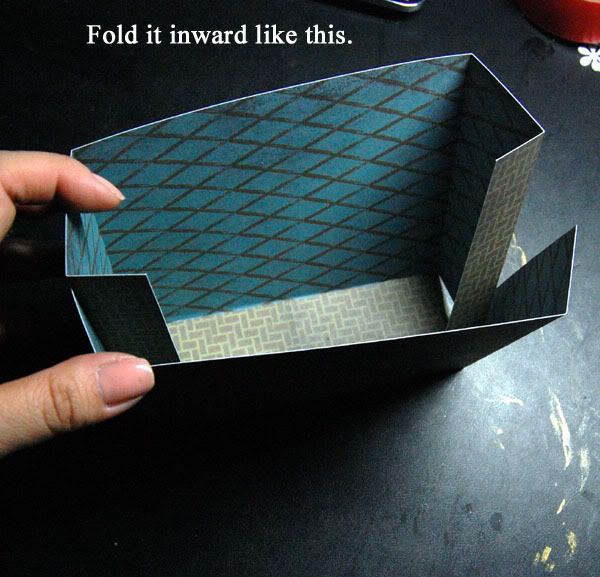
Tuck flaps in and assemble box as shown.
-
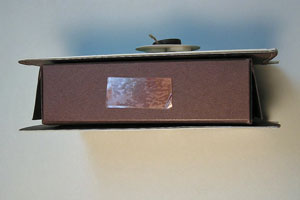
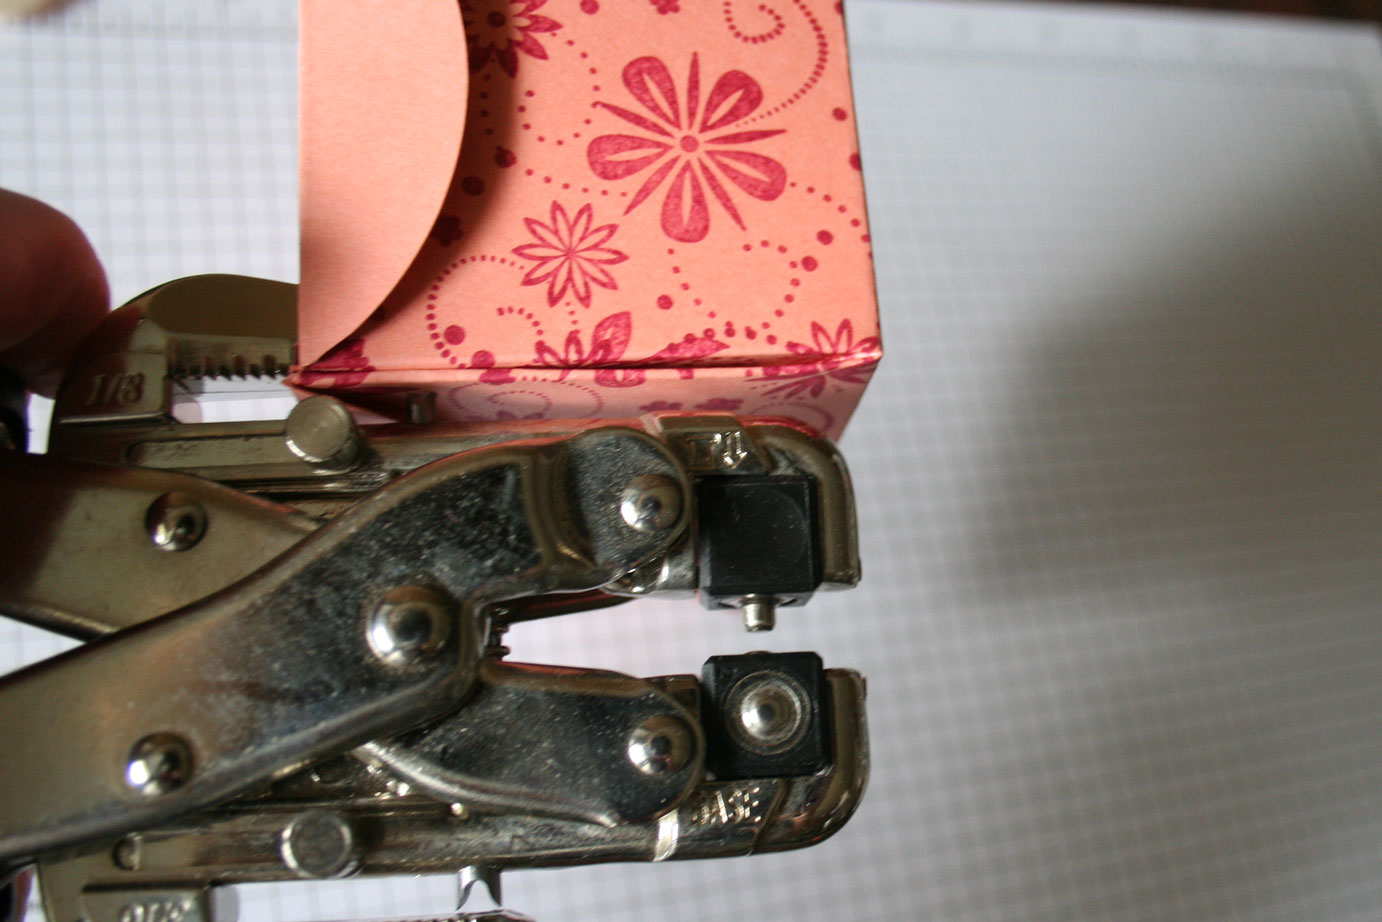
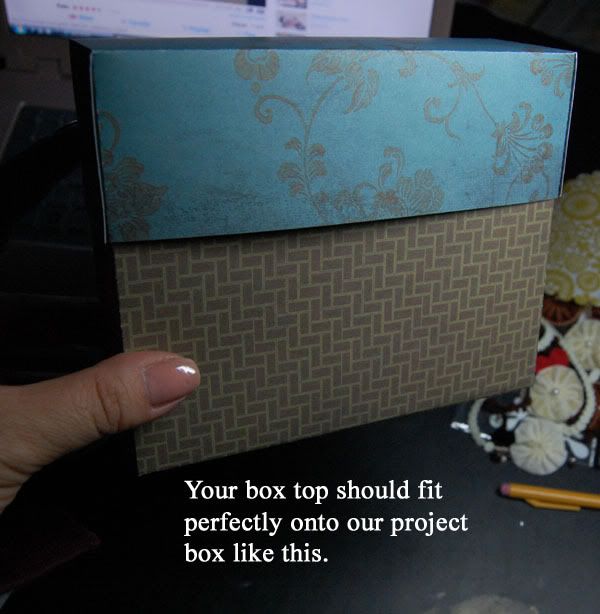
Step 8
Attach Sticky Strip tape to the top and bottom of the box and attach the wood sheet pieces, lining up the straight edges with the side spine of the box as shown.

-
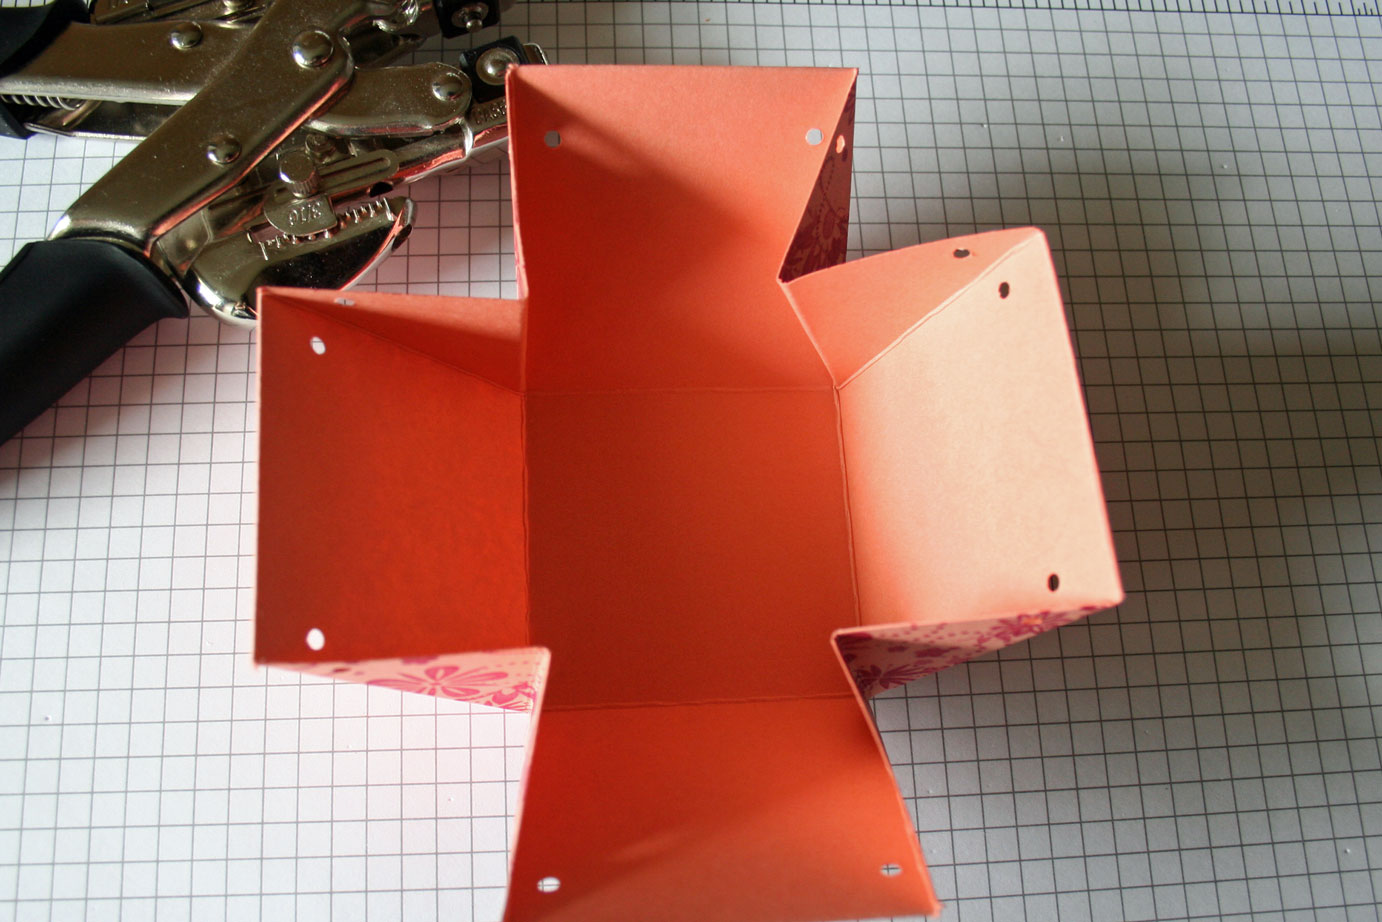
Step 9
Attach a small piece of Sticky Strip tape to the side spine of the box as shown.
-
Step 10
Attach ribbon to Sticky Strip™ to keep it in place.
-
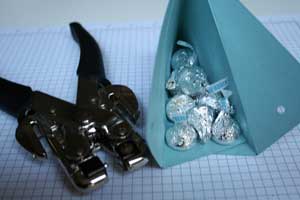
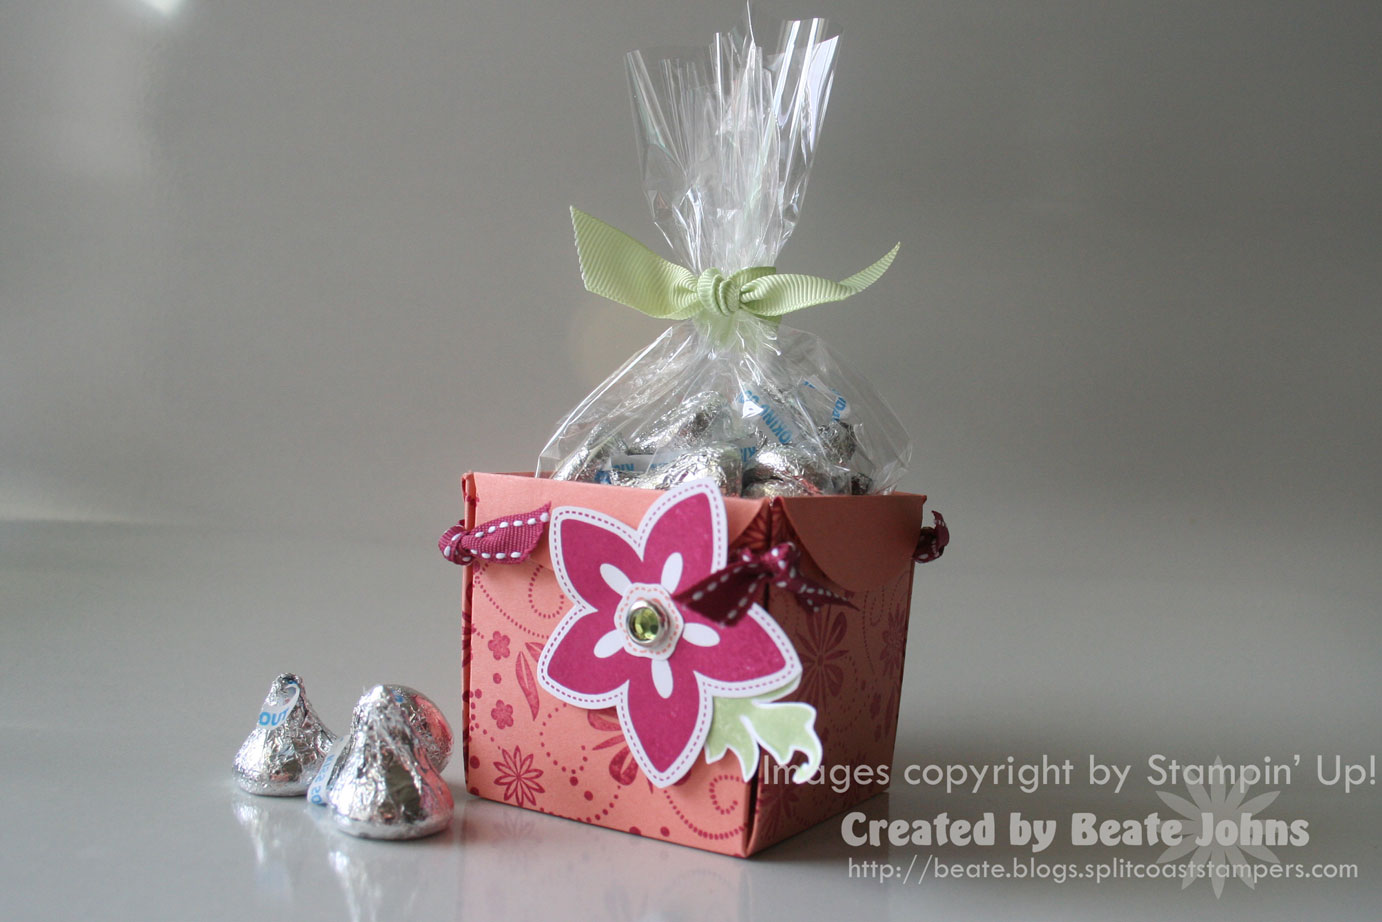
Step 11
Fill box with crimped, shredded cardstock and gift or candy treats!
-
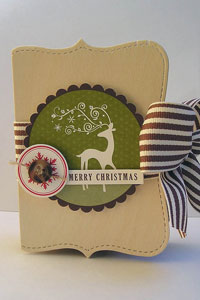
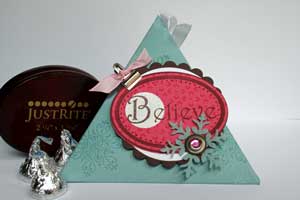
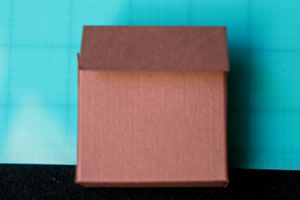
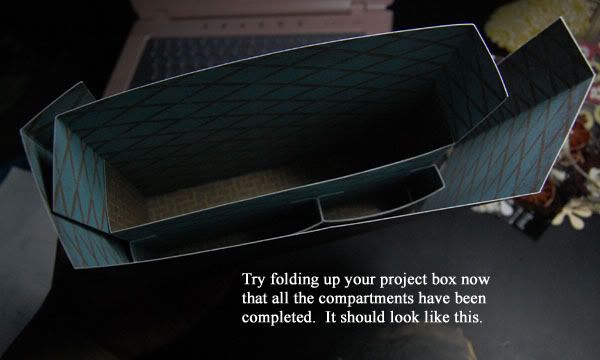
Tie ribbon and decorate your front.
Your box is done.
Video!
Variations
-
Use Eyelets:
Attach jumbo eyelets as shown, run Sticky Strip™ tape along the inside of the front and back cover to attach ribbon before adhering the covers to the box.
-
Supplies
- 5" x 10" piece of Cardstock
- Scoring Tool
- Scor-Tape™ or other strong adhesive
- Crop-a-Dile™ or other hole punch
- Stamps
- Ink
- Ribbon
- Pencil
- Additional cardstock and embellishments
Step-by-Step
-
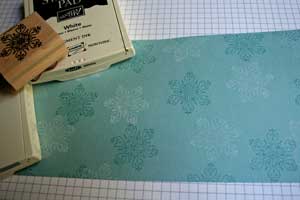
Step 1
Stamp your cardstock.
-
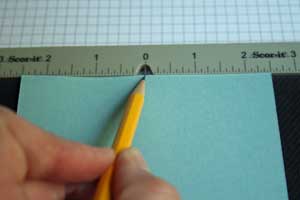
Step 2
Turn your cardstock around.
Mark the middle of both short sides of the cardstock with a pencil.
-
Step 3
Score your cardstock at 5" on the long side.
-
Step 4
Line up the mark you made on one of the short sides with the middle of long side.
Score to create a diagonal fold.
-
Step 5
Line up the mark with the other side of the middle fold and score.
You will now have a triangle of scored lines.
-
Step 6
Repeat step four and five on the other side of the cardstock.
-
Step 7
Prefold all your score lines.
-
Step 8 (Optional)
Add strong adhesive to the edge of one of the long sides.
-
Step 9
Assemble the box by bringing the two ends together and securing with the adhesive just applied.
-
Step 10
Use a Crop-a-Dile™ to punch through the taped sides.
-
Bring both of the opposite sides together and punch a hole through them as well.
-
Step 11
Fill your box.
-
Step 12
Thread your ribbon through the punched holes. It will keep your box closed.
-
Step 13
Tie ribbon and decorate your box front.
Video!
Variations
-
Change the size
You can make this box in a lot of different sizes. Just keep the length of your cardstock two times the width (e.g.: 3" x 6", 4" x 8" and so on).
The picture here shows a box made out of a 2 1/2" x 5" piece of cardstock. It holds one Dove chocolate piece.

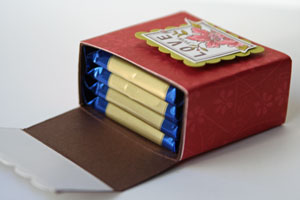
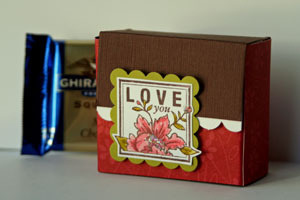
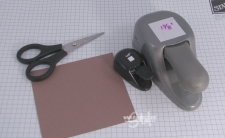
Supplies
- One 4 1/4" x 8" piece of cardstock
- One 2" x 8 1/4" piece of patterned paper, optional
- Paper Cutter
- Scoring Tool, Scor-Pal™ used here
- Scor-Tape™ or other strong adhesive
- Scissors
- Foam Tape or pop dots
- Stamps
- Ink
- Additional Cardstock
Step-by-Step
-
Step 1
Score the short side of your cardstock strip at 1" and 3 1/4".
Hint:
When using the Scor-Pal™ score at 1", then turn paper 180 degrees and score the other side at 1" again.
-
Step 2
Score your long side at 2", 3", 5" and 6".
-
Step 3
Cut off the outer strips 3" up on one end. This will create your box flap.
-
Step 4
Use a bone folder to crease score lines.
-
Step 5
Cut the 1" score lines on both sides.
-
Step 6
Add Scor-Tape™ both 1" x 2" strips next to the box flap.
-
Step 7
Flip your cardstock over and add tape to the 1" tabs.
-
Step 8
Remove the tape liner from the 1" tabs and fold inward.
-
Remove the liner from the 2" strips and bring sides together to form box.

-
Step 9
Trim box flap. Here, it was cut down 7/8".
-
Your box is done. It's time to decorate it.
-
Step 10
Apply adhesive to the back of the patterned paper.
-
Step 11
Adhere patterned paper around your box.
Note:
The ends of the paper will overlap a bit.
-
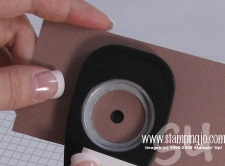
Step 12
Create a closure for the box by stamping or punching a small image.
Add foam tape on the lower part of the back of that image.
-
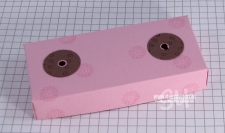
Step 13
Remove liner and adhere the punched piece to the lower part of your box so that the lid can slipped underneath.
Fill with chocolate.
-
Your box is finished. You can find it here in the gallery (with a listing of all supplies).
Video!

I’ve had a number of people ask me how I made this little gift card box, so I decided to create a picture tutorial for it.
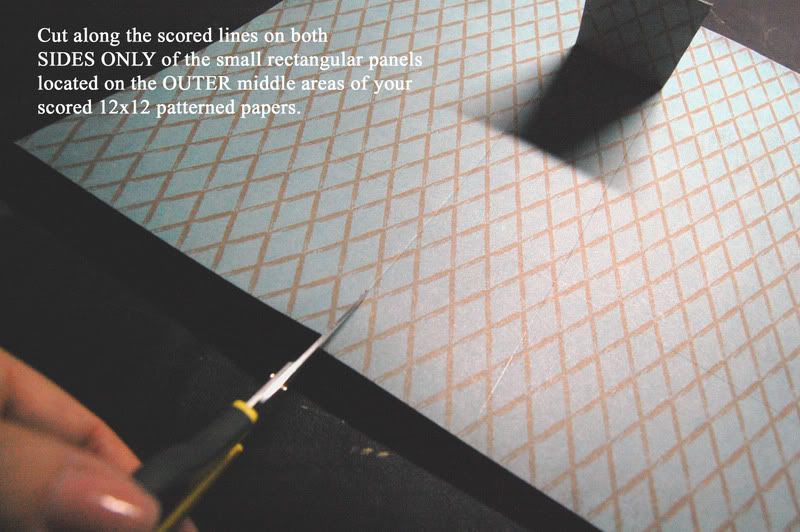
Step 1 For the base of the box cut a sheet of cardstock to 5 3/8" x 8" and score along the short side at 1". Flip the cardstock 180 degrees, then score on the other end at 1"
.

Step 2 Flip the cardstock 90 degrees, then score along the long side at 3 1/4". Rotate 180 degrees, then score the other end at 3 1/4".

Step 3: Fold along the score lines, using a bone folder to help achieve a crisp, clean edge. Then cut along the 3 1/4" score lines just until you reach the 1" score line as shown in the picture below.

Step 4: Place a small strip of double sided tape or sticky strip along the outside top edge of the small flap. Keeping your box bottom flat on the table, fold up one side of the box. Place a strip of double sided tape or sticky strip along the edge (on the inside) of each of the long flaps.

Step 5: Again keeping your box bottom flat, fold up the other side of the box. Note that the box flaps do not overlap completely.

Step 6: For the lid, cut a sheet of cardstock to 4 – 3/8" x 2 – 9/16". Score at 1/2".

Step 7: Score at 1/2" along the remaining 3 sides.

Step 8: Fold along the score lines, again using a bone folder to get a crisp, clean edge. Cut on the score lines along the short side of the cardstock, just until you reach the intersecting score line as shown in the picture below.

Step 9: Fold the smaller flaps to the inside and tape to the side flap as shown below. Repeat on the other side.

Step 10: Your box is now finished and ready to decorate.

I hope you’ve enjoyed this tutorial. This is the first step by step picture tutorial I have ever created so any feedback would be appreciated!
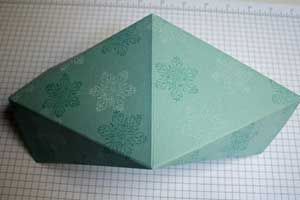
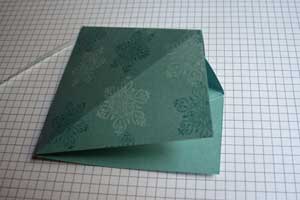
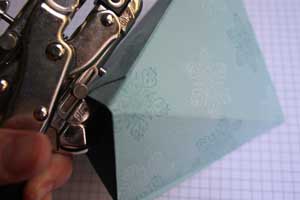
Isn’t there something delicious about being able to see what’s inside a box as soon as you get it? Especially when they are treats you can eat? I just love these little clear acetate boxes! I made these when I found this Technique Lovers Challenge on Splitcoast. Check out the gallery! It’s definitely eye candy!! You can see the tutorial for these there as well in a pdf file. I however, have never been very good at following directions exactly, and I always seem to change a little something here or there, so I have included my own mini tutorial showing how I made these. They really are VERY SIMPLE to make! STEP 1. Cut a 6″ x 6″ patterned paper of choice (or stamp your own card stock) into four 3″ x 3″ squares.
This will make two acetate boxes.
 STEP 2. For each box you make, score two of your 3″ x 3″ squares a half inch in on all sides.

STEP 3. Cut slits up short fold lines on opposite ends of the square.
Fold in all sides and glue short ends on inside of long ends, for box top. Repeat for box bottom.
 STEP 4. Cut a piece of acetate 3 1/2″ x 8 1/4″ long. Score along the length at 2″, 4″, 6″, 8″ . You may have noticed by these measurements that the box is the same size (2″ square) as the lid. But I find that just the folding of the edges shortens the sides just enough so the box will fit snugly inside the box bottom and top. If you prefer to loosen things up, just score a 3 1/2″ x 8″ length of acetate at 1 15/16″ for all four sides, with a 1/4″ to spare for the closure.

STEP 5. Using clear Terrificaly Tacky tape, close close the side of the box, making sur the 1/4″ piece is on the inside of the box, so you will have a smooth outer edge. Then tape all 4 sides along the bottom.
 STEP 6. Push the acetate box into the box bottom, making sure you can grab an edge of the red tape cover layer, then peel off the tape covering each side. Alternatively, you can remove the tape covering first and then insert the acetate box into the box bottom, but it can get a bit sticky and tricky to get it to sit just right at the bottom.
That’s it! You can now decorate the box as you like. For more inspiration have a look at these wonderful samples by other bloggers:
Paper Cookies
Toy’s Haven
Beate sweet!
Tinkering in Ink with Tanya (love this box top)
Paper and Ink Playground Adorable PTI house
The possibilities are endless!!
Why don’t you have a go at these, and if you do, link it in a comment because i would love to see yours too!! Wouldn’t they be great for last minute office gifts, teacher thank you’s, house parties, friends, neighbours…..
I hope you liked today’s tutorial! Let me know what you think and if you have any questions, feel free to ask!
First we gotta make a pattern. Get a plate and trace um onto one piece of paper.

No matter. Can be any size you like.

Yes, and then fold um in half and then open um up and fold it in half one more time.
All pau?
No, fold um in half again two more times until you get eight equal parts. You know, like when you cut one pie.

Now, it's time for cut out the fabric.

Thanks eh! I bought um in Japan. Okay, where we was? Oh yeah. Use your pattern for cut one circle for the outside, one for the lining, and I also cut one from a super stiff interfacing. But you no need add the interfacing if you no like.
Okay I get um! Time for sew?
No, wait. I almost forgot, we have to mark it. Get your guja guja thing and mark the lining fabric with transfer paper along the outer edge of the fold lines.

Yeah, guja guja thing. You know, it makes the "guja guja" sound when you use it. Eh, no tease! Anyway, mark the lining fabric on the side that's going show. Now it's time for sew. Pin the three layers together, outside fabric on the top (right side down), lining fabric in the middle, and interfacing on the bottom. Sew along the edge of the circle, using 1/4" seam allowance.

Can if you like, but I usually sew it closed and use my seam ripper for take off the stitches and make one opening. That way, I can use the holes as one guide for sew um closed after I turn it right side out.
You so akamai!
Mahalo! Okay, after you pau sewing, clip around the curves or trim it close to the seam, make one opening and then turn um right side out. Use one ladder stitch to close it up.
Ladder stitch? What is that?
Try wait. Here, sew um like this. Now you should have a nice circle.

Yup, only one more step. Turn over the circle to the lining side. Hopefully you can still see your guja guja marks. Use your pattern as a guide for where to place the snaps.

Oh, I never? Sorry eh! We going use snaps for make the box. Sew four sets of snaps onto the outer edge of the lining just like in the picture.
Alright, I went sew all the snaps. But how come no look like one box?
Wow, you pau already?! Okay, now is the fun part. Snap 1 and 2 together and then 3 and 4, 5 and 6, and then 7 and 8. And tah dah! Fabric box!! And if come all pilau, you can just un-snap it and throw um in the wash. How's that? Easy yeah?


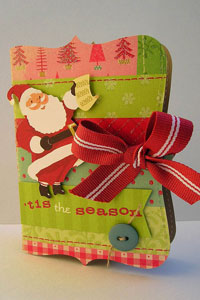
Are you ready? This is just the cutest box EVER. I must say that I am so pleased with how this turned out. This box was inspired by a card I saw on pg. 92 of the March 2008 Papercrafts magazine called an Easter Surprise Card. Since my theme for this tutorial blitz is Easter Treat Boxes and all the supplies I am using are current Stampin’ Up!, I put on my thinking cap and tried to figure out a way to incorporate the idea in a box format. The challenge of this box was that I wanted to use my new favourite Easter stamp set called A Good Egg, so I had to design a box that was big enough. This is what I came up with: a peek-a-boo gable box. So what’s the surprise? Check out the picture below.

Isn’t the little chick sweet just peeking out from inside the egg? Anyways, I’ve created a template which you can download below, but please remember it is a visual template only – it is NOT meant to printed out onto CS otherwise the dimensions will be all wrong.
Download the template here.
Supplies:
- Stamps: A Good Egg
- Ink: Black Staz On, Chocolate Chip, So Saffron, Pumpkin Pie Classic Inks, So Saffron WWC
- Paper: Close to Cocoa, Pretty in Pink, Whisper White CS, Berry Bliss DP
- Accessories: 5/8" chocolate grosgrain ribbon, 2-way glue pen, dazzling diamonds glitter, square and circle rhinestone brads, 1/4" handheld punch (I use a normal handheld one instead of SU’s) 1/16" handheld punch, tab punch, boho blossoms punch, hobby blade & craft mat, paper snips, pencil and ruler, coluzzle cutting system (oval template, mat, blade), sticky strip, Stampin’ Dimensionals, acetate
- Treats of course!
Dimensions:
- Close to Cocoa CS 8 1/2" x 11"
- Pretty in Pink CS 3" x 4 3/4" cut so that you have a piece that is 1 1/2" x 3" and another piece that is 3 1/4" x 3"
- Berry Bliss about 4" x 4"
- Acetate 3 1/2" x 4 7/8"
Step-by-step Tutorial:
Step 1: Score your 8 1/2" x 11" sheet of Close to Cocoa CS as shown in the template (with the 11" side butted up against the top of your personal paper trimmer you are going to score at 1 1/2", 4 3/4", 6 1/4" and 9 1/2". Rotate so that the 8 1/2" side is now butted up agains the top of the trimmer and score at 1 1/2" and 6 1/2"). Crease along the score lines and trim out the areas shown in gray on the template.

Step 2: Stamp the small flower stamp in Close to Cocoa ink on what is going to become the box front.

Step 3: Lay your template onto the coluzzle cutting mat. Align your oval template so that the top and bottom of the largest oval is aligned with the top and bottom score line of the box front. The left and right sides of the third oval (counting inwards) should be aligned with the left and right score lines on the box front. Using your coluzzle blade, cut the fourth oval from the center out. Save the oval piece.

Step 4: Flip your template over. Using a pencil and ruler measure in 1/2" from the top left and right corners and 1/2" down from the top score line. Draw a line that is about 1" long. See the picture below.

Step 5: Using your 1/16" handheld punch, punch a small hole at the top and bottom of each 1" line.

Step 6: Using your craft mat, hobby blad and a metal edge ruler, cut a small channel between the two holes making the channel the width of the holes. Set it aside for now.

step 7: Stamp the large egg from A Good Egg stamp set in Chocolate Chip ink onto your Berry Bliss DP. Take your Pretty in Pink 1 1/2" x 3" piece of CS and attach your egg as shown below.

Step 8: Stamp your chick from A Good Egg twice onto a scrap of white CS in Black Staz On ink. Color and cut out one chick (minus the legs) and then simply cut out the other shell. Take your CS with the mounted egg and flip it over. Take the shell piece, flip it upside down, center and align it as shown then trace the jagged edges, bringing them out the edges of the egg as shown in the picture.

Step 9: Lay your egg onto the craft mat, and using the hobby blade, carefully cut along the lines to create your jagged edge.

Step 10: Position your chick behind the bottom portion of the egg (align the jagged edges of the chick’s shell with the jagged edges on the big egg), then center and mount it along the bottom of the box front.

Step 11: Flip your template over. Take your 3 1/8" x 4 7/8" piece of acetate and adhere to the back of the box front. Be sure to add some adhesive to the back of the chick as well so that it is snug against the acetate and doesn’t get caught when you are opening and closing the egg. Take your hobby blade and cut the channels through the acetate.

Step 12: Take your 3" x 3 1/4" piece of CS and carefully match it up with the bottom piece – but DO NOT STICK IT. If you have it you can use Dotto (a temporary adhesive that can be rubbed off) to hold it in place. If you don’t have Dotto, carefully hold it in place and flip it over so that you are looking at the back.

Step 13: Use your pencil and make a mark at the bottom of each channel. Be very careful with this step – before you make your pencil marks BE SURE that your CS has not shifted.

Step 14: Take your 1/16" handheld circle punch and punch a hole over each pencil mark.

Step 15: Stamp Happy Easter in Chocolate Chip ink so that it is centered betweent th two holes you punched. Align the cs with the bottom piece, insert a square rhinestone brad through each hole and open the prongs at the back. Align the top portion of the egg with the bottom portion and stick down. Punch a tab out of the oval piece that you cut from the center of the box.

Step 16: Make sure the prongs of your brad are perpendicular to the channels so that they don’t slip out. Open and close the egg a few times to ensure they are sliding smoothly up and down the channel.

Step 17: First off, let me say that I accidentally went on sticky strip overkill. You only need to place sticky strip on the two large flaps and NOT on the small flaps as well like I did!

Step 18: Remove the backing of the sticky strip from the large flap that is attached to what will become the back of the box. Adhere the two small flaps to it as shown.

Step 19: Remove the backing from the other large flap and adhere to the box base. Lay the box upside down onto your grid paper. Remove the backing from the sticky strip on the side flap, then adhere.

Step 20: Fill your box with treats. Bring the two top ends together – you can use sticky strip to hold them together.

This quick and easy little Easter Pouch is the perfect way to showcase some of the colorful treats that are available around this time of year. When choosing my colors – it I am planning the treat to be visible, then I try to coordinate the CS colors with the colors of the treats.
Supplies:
- Stamps: A Good Egg
- Ink: Black Staz On, Black Stampin’ Spot or Stampin’ Write marker, So Saffron and Pumpkin Pie Classic inks, So Saffron and Going Gray WWC (Watercolor wonder crayons)
- Paper: Pretty in Pink, Whisper White CS
- Accessories: Stampin’ Up!’s small cello bags, oval coluzzle template, coluzzle mat & cutting blade, personal paper trimmer with scoring blade, paper snips, bone folder, Three Flower punch from Three for You Punch Box (any small flower punch would work), wide chocolate grosgrain ribbon (5/8"), smallest pink circle rhinestone brad, blender pen, stamp-a-ma-jig, stapler, sticky strip, Stampin’ Dimensionals, corner rounder punch with guard removed (for the scalloped edge)
- Pretty in Pink CS 3 1/8" x 10 1/2" (1 sheet of 8 1/2" x 11" CS will make 2)
Step-by-Step Tutorial
Step 1: Take your 3 1/8" x 10 1/2" strip of Pretty in Pink CS and score it at 1", 5" and 6 1/2".

Step 2: Fold along the score lines using your bone folder. Flip the cardstock over so that the outside of the box is facing you. Stamp the small flowers stamp all over the flap that will be at the front in Pretty in Pink ink. Color in the flower centers with a white signo gel pen.

Step 3: Align the Coluzzle oval template on the front flap of the box so that the 4th oval (counting from the inside) is sitting right on the score line and the sides of the CS are aligned with the 3rd Oval (counting inwards from the outside). Cut the THIRD oval in from the center using your coluzzle blade (I know the picture labels it as "circle" – that was a typo).

Step 4: Remove the oval (using your snips to cut the two little "tabs" that are stil holding the oval in place.

Step 5: Using your corner rounder punch with the guard removed, punch a scalloped edge along the smallest flap. If you are unsure how to do this, Beate Johns has created a tutorial to show you how. See it HERE.

Step 6: Stamp the chick in Black Staz On onto a scrap of white CS. Color in using your blender pen and the colors listed in the supplies section. Cut it out using your paper snips and set aside.

Step 7: Using your stamp-a-ma-jig if necessary stamp Happy Easter towards the left side of the box fron so that it is slightly above the oval window.

Step 8: Place your treats inside the small cello bag. fold over the top edge and staple it shut (make sure you place your staples towards the right and left edges as you don’t want them to interfere in the following steps. Place a strip of sticky strip along the top edge of the pouch back just underneath the flap. Remove the backing and stick the top of your pouch onto the stick strip.

Step 9: Once your treat is inside, bring up the front flap the fold over the small scalloped top flap. Flip your pouch upside down, align it with your grid paper, take note of the center (approx. 1 1/2") and make two small pencil marks so that they are of equal distance to the left and right of the center.

Step 10: Punch out 2 holes where you marked using a 1/4" circle hole punch. As you can see from the picture I used just a regular hand held hole punch as it was able to go through all 3 layers of CS at once. If you use Stampin’ Up!’s or any regular lever punch it will only be able to go through 2 layers at a time.

Step 11: Take a 6" piece of wide chocolate grosgrain ribbon and starting at the front of the box, feed the ends through towards the back as shown in the picture.

Step 12: Flip your pouch over so that you are now looking at the back. Take the left end of ribbon, bring it across and feed it through the right hand hole.

Step 13: Now bring the right side of the ribbon across and feed it through the left hand hole. Make sure both ends have been pulled through fairly tightly. Set your pouch aside for a moment.

Step 14: Take your Three Flower punch and punch a small flower from a scrap of pink CS. Position the flower onto the chick’s shell and stick using 2-way glue pen or other liquid glue. Punch a hole through the center of the flower and the shell using a 1/16" handheld circle punch. Insert the smallest circle rhinestone brad you have throught the hole and open the prongs on the back. Add two stampin’ dimensionals on the back close to the edge where the back of the brad is showing.

Step 15: Looking at the front of the pouch now, pull the ends of the ribbon so that they are snug, then trim the ends on an angle as shown. Peel the backing off of the Stampin’ Dimensionals and attach the chick to the front.

Fabric Covered Box
Instructions make a 5x5x2 ½ box
Supplies:
¼ yard (9”x 45”) of two coordinating fabrics
batting scraps
matt board
tacky glue
clothspins
masking tape
wet cloth for wiping glue
box cutter or exacto knife with new blade
ruler
pencil
scissors
Cutting Mattboard: Use an exacto knife or box cutter to cut and label the mattboard to the following sizes.
Outside Top - 5x5 inches
Outside Bottom - 5x5 inches
Inside Top - 4 ¾ x 4 ¾ inches
Inside Bottom - 4 ¾ x 4 ¾ inches
Outside sides (4 pieces) – 2 ½ x 5 inches
Inside sides (4 pieces) – 2 ¼ x 4 ¾ inches
Cutting the batting: Cut a piece of batting the same size as each piece of mattboard.
Cutting the fabric:
Cut a piece of fabric a ½ larger (on all sides) than the “outside top” and “outside bottom” mattboard pieces. The four “outside side” pieces will be covered as one piece. Tape the four “outside side” pieces together leaving an 1/8 inch gap between them to form one long piece. Cut a piece of fabric ½ larger (on all sides)than the entire strip.
Using the coordinating fabric cut a piece ½ larger (on all sides)than the “inside top”, “inside bottom”, and four “inside side” pieces. Note that the “inside side” pieces are done separately – NOT as one long piece like the outside.
Covering the box with fabric:
Begin covering the “outside” pieces of your box using the fabric you chose for the outside of your box.
One piece at a time, place the fabric on the table (pretty side down), lay a piece of
batting on top of it, then the mattboard on top of the batting. All layers need to be
centered neatly. Glue the four corners neatly in place. This step will help create nice
sharp corners when the box is done. Use a clothespin to hold it in place until it sets.
But don’t leave the clothespins on until the glue dries or the clothespin will be glued to your project.

Continue to glue down the four sides of each piece.
Use clothespins as needed until the glue sets.

Cover the four “outside side” pieces as one long strip.
Using the same method described above, continue to cover the “inside” pieces of the box using the coordinating fabric. Remember that the “inside side” pieces are covered individually – NOT as one long strip like the outside of the box.

Assembling the box:
Make a small fabric hinge the width of the box top from
a scrap of fabric. Attach this to the back of the
“outside top” piece and the “outside side” piece.
Make a small tab out of a scrap of ribbon and attach to
the back side of the “outside top” piece. This will be used to open and close your box.
Continue to glue the “inside” pieces to the “outside” pieces. Apply the glue all the way around and close to the edge of each piece and put a line of glue down the middle of each piece. Center each piece neatly. Use the wet towel to wipe an off any glue that leaks out along the edges. Use clothespins to hold in place until the glue sets firmly. If they can be left in place until the glue dries, even better.
Glue the “bottom inside” and “bottom outside” pieces together. Use the wet towel to wipe an off any glue that leaks out along the edges. Use clothespins to hold in place until the glue sets firmly. Set aside.

Finishing the box:
Remove any clothespins. Fold the “outside side” pieces around to form the box. Glue the open edge together. . Use the wet towel to wipe an off any glue that leaks out along the edges. Hold this edge in place with a strip of masking tape.
Place glue along the inside edge of the box bottom piece. Center it neatly against the box sides. Use the wet towel to wipe an off any glue that leaks out along the edges. To hold the box in shape while it dries, tape all around the box edges with masking tape. Let the box dry several hours or overnight if possible.
When dry, remove the masking tape. Check all the box edges to make sure the seams are sealed. You can add a dab of glue to any seam that did not seal the first time
 Here is the Take out Box tutorial I promised:
I made this one with 2 1/2″ sides, but you can change that up really easy.
To see the tutorial, click on more.
Supplies:
- One 9 1/2″ square cardstock piece
- Scoring tool
- Paper Cutter
- Scissors
- Ribbon
- Crop-a-dile or other hole punch
Step 1:
Score your cardstock at 1″, 3 1/2″, 6″ and 8 1/2″.
Step 2:
Turn your cardstock 90 degrees and score again at 1″, 3 1/2″, 6″ and 8 1/2″.
Step 3:
Cut away the outer score panels, leaving only the center panels. These will be the flaps of your box.

Step 4:
Add diagonal scores to your corner squares.
For Scor-Pal users: Line your cardstock up with your corner point at the 5 1/2″ mark. Make sure the point of your lower square is lined up with the 5 1/2″ line. Now score your two outer squares.
Step 5:
Repeat step four on your other two outer squares.
Step 6:
Cut from the low point of one flap, to the low point to the next flap. It will cut your outer squares in half, leaving only a scored triangle. Repeat on all four corners.
Step 7:
Stamp your box front. It’s okay if your images overlap a little at the triangle sections. Those won’t be seen.
Step 8:
Prefold all your scores.

Step 9:
Decorate your flaps. I cut mine with my Coluzzle. You can also cut it with decorative scissors, add scallops with your corner punch or even leave them straight.
Step 10 (optional):
Tape your flaps down. I used dimensionals so the flaps would stick right on the wall. It will show them off more.
Step 11:
Fold one side up at a time and punch a hole with your Crop-A-Dile or other hole punch.

Inside View:
I punched through the the side triangles to make them stay put on the sides.
Step 12:
Punch a hole on the left and right of each side of the box.
Step 13:
Hold box together by threading pieces of ribbon through the holes and tying knots.
Step 14:
Decorate your box and fill it.
You can change the size up of this box really easy. Your square cardstock has to be
3x the size of your side plus 2x the width of your flap.
Decorate the flap a different way. Check step 9 for some other flap ideas.
Make your flaps longer ovals and use those to make a pointed lit.
OK, so yesterday I said there was 2 tutorials in the picture. I really hope you know how to make hot chocolate, cause that is NOT the tutorial...BWAHAHAHAHA!
You are going to have to click to read more, otherwise, with that many pictures, it would take forever to load.
For the name tags, I used my JustRite Oval stamper, the Small Letter Font, the Brayton Font and a border from the Oval Birthday Stamp Ensemble. These are available at All That Scraps or JustRite.
For the box itself, you will need a sheet of CS that is 11 X 6 5/8. You need for pieces of Designer Paper that measure 2 1/2 X 3 7/8. You will need a 4 1/4 X 4 1/4 square for the lid. Now it is time to get creating!
This is the square for the lid. You will need to score on all sides at 3 1/2. In this picture, I am doing my last score, and you can see the other lines already. You can put this aside till we are ready for it. First, we will put the box together.
Take the largest piece of CS and score at 2 5/8 down the long way. Then turn the CS, and score at 2 5/8, 5 1/4, 7 7/8, and 10 1/2. Fold all of the score lines and burnish with a bone folder to get strong crease lines.
After you have burnished the CS, cut the bottom flaps apart, and the smallest flap off, as pictures. You should be cutting on the score lines. The bottom is the 2 5/8 section, and the top is 4 inches tall. Now starts the explaining : OK, see those arrows? Can you see my score lines, that is kinda what I am pointing at there. I did draw on them with a black sharpie so you could see them, but you won't need to do that. On my Coluzzle, the red oval fits perfectly ON those score lines - it is line #5 from the center. Then put the bottom of the oval ON the botto score line. Now, cut your oval from LINE #3 from the center, on mine it is the orange one. By using the score lines to guide you , you are making sure that it is centered. Remember, you are cutting on line #3 from the center.
This is where your oval should be. I put it in one of the two middle sections, doesn't really matter which one. Now, we need to get the DP centered as well. If you see where the stars are, you notice them same red line on my Coluzzle, #5, and that they fall inside a bit. Make sure they are inside evenly on each side, but you want to be up a bit on the bottom too, about 1/8 of an inch. Since this piece of DP is smaller, than you need to make compensations to make it centered. If you do it like I say here, it will look like this, after you glue the DP on.
Put some Sticky Strip onto the small flap at the end, peel off the liner and adhere your box together!
Holding the box upside down, with the oval facing you fold in the two side flaps. Then fold down the back one, and add your sticky strip. After you peel off the liner, you can fold the front one down. The reason I say to do it in this order, is then you will NEVER see the flaps on the bottom in the front. This makes it more finished off! Time for the lid.
Holding the lid square, make ONE cut on the bottom left. Turn a quarter turn and cut on the bottom left, turning and cutting, till you are all done. It should look like the first picture. I then scalloped the edges of my lid. Add glue to these tabs, to make the lid or do the next optional step. I scalloped my edges with the Stampin' Up! scallop edge punch. you then need to cut the squares down, to be able to hide them under the scallops.
I laid my lid down on my self healing mat, and cut a wide slit on each side of what will be the top. Then, you can glue your lid together, as pictured.
Using the cut out DP oval you have on your desk, cut a circle, or punch it out with the 1 3/4 circle punch. Measuring how big it is on the Coluzzle, cut the next biggest ring around it, in this case, colored yellow.
Then you go around your circle with the corner rounder, to make a scalloped edge. Those of you that have the nesties could do it that way, as well. Then, when you glue it on to your box, the part that you cut out, should match the front of the box. How perfect is that ?!? I also added dots in my scallops with the chocolate marker.
I first saw the box posted on Splitcoaststampers by "flowerbugnd1" and she used the template from Julie Buhler on her blog. Click here for her template

Step1: Cut Pretty in Pink cardstock to 7" x8"
Step2:
Score 8 in side at 3" and 5"
Score 7" side 1 1/4" from each end.
(Refer to Julie’s template above)

Step 3: Cut ends as in picture.
Step 4: Stamp randomn images in Pretty in Pink ink. I used the small stamp from One of a Kind.

Step 5: Add Sticky Strip or a strong adhesive.
Tip: If you find it hard to take sticky strip apart, use the tips of your scissors to pull apart.

Step 6: Fold your box.
Create your "Faux Photo Corners":
Materials: 1 3/8" square punch, 1/4" square punch, Scissors, Close to Cocoa cs

Step 7: Punch a square using the 1/4" sq. punch

Step 8: Center your punched square in the window of the 1 3/8" square punch and punch.
 Step 9: Use your scissors to cut the square in half from corner to corner.
 Step 10: Stamp your corners using Chocolate Chip ink.
Step 11: Punch out a Round Tab.

Step 12: Punch a 1/4" circle
Step 13: Punch again using the 1 1/4 circle punch making sure to center.
Create your Lid:

Step 14: Cut Pretty in Pink to 3 5/8" x 6 1/8"

Step 15: Score 3/4" from all edges.

Step 16: Cut up to the 3/4" edge on the long ends and fold in. Add Sticky strip on 4 ends.

Step 17: Use the 1/8" circle punch to punch a hole for your ribbon.
Step 18: Add your pre-punched circles.
Step 19: Stamp your ribbon using Chocolate Chip Classic Ink

Step 20: Loop your ribbon through and form a double knot.
 Step 21: Adhere your corners to your box. I added them to both sides.
 Step 22: Stamp your image to the middle of the round tab, punch a 1/16th circle through the front and back of your tab. Stick in your Pretty in Pink brad.
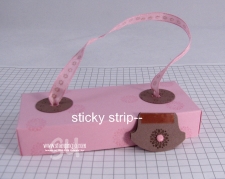
Step 23: Add sticky strip to front of your tab as shown and adhere the tab to the inside of the lid.
Here’s a close up of the box open

Close up of box closed
WHAT YOU WILL NEED: For a 3″ x 3″ box
Decorative card stock (sturdy double sided ) cut to 10.5″ x 3 1/8″ (I used Parisian Breeze specialty dp from Stampin’ Up!)
Coordinating card stock (for inner box body) Cut to 6″ x 6″
Strong small magnets (Basic Grey magnetic snaps work well)
Adhesive

STEP 1: Score your 10.5″ decorative paper at 1.5″, 4.5″, 6″, and 9″ so it can fold as shown above.
STEP 2: Score your 6″ x 6″ card stock at 1.5″ in on all four sides.

STEP 3: Fold two side in to meet at the middle, as shown above.
STEP 4: Score the four corners on the diagonal, as shown above.

STEP5: Crease all scored lines well for easy folding.

STEP 6: With long decorative paper laying flat (the side that you choose as the inside of your box facing up), place and adhere the inner box on top, lining it up just inside the the bottom edge. The score lines on both pieces will line up perfectly. See photo above.

STEP 7: Once the two pieces are adhered together, open the folded edges and apply adhesive only to the outer four corners, as shown above. Close in the edges again to adhere well.
The magnet should be adhered to the center bottom (between the glued corners). The other magnet should be adhered to the top center flap. Sorry, no picture of this, but I think you get the idea. The top flap magnet is concealed behind the ribbon in the photo below.


You can make 2.5″ x 2.5″ boxes by simply using DP cut to 8 3/4″ x 2 5/8″. Scored at 1 1/4″, 3 3/4″, 5, and 7 1/2″. The inner box piece would be 5″ x 5″. Scored at 1 1/4″ on all four sides.
I hope you enjoyed the tutorial. I tried to make this as clear and concise as possible. If you have any questions, feel free to ask!
Materiales:
- 1 papel estampado doble cara.
- 3 papeles que pueden ser estampados a doble cara o no, o lisos.
- Cinta
- Embellecedores
- Fotos
- Materiales de trabajo que normalmente utilizamos como pegamento, tijeras, glitters, etc.
Nota Importante: La Exploding box se puede hacer de una sola página, para los que realicen este proyecto con una sola página recuerden que deben utilizar la medida de 24x24 cm y el papel a doble cara para que cuando la cerremos por fuera se vea estampado o de color liso.
Paso 1:
Tenemos que hacer 3 cuadrados de diferentes medidas, las medidas son las siguientes:
Cuadrado grande: 24x24 cm
Cuadrado mediano: 22,5x22,5 cm
Cuadrado pequeño: 21x21 cm
Paso 2:
Una vez tenemos 3 cuadrados debemos doblar de diferentes maneras, les explico a continuación:
Primero marcar una línea muy tenue con lápiz:
A 8 cm para el cuadrado grande (24x24cm).
En el cuadrado mediano (22,5x22,5) la línea se debe hacer a los 7,5 cm.
Y para el cuadrado pequeño (21x21cm) a los 7 cm.
Si les va mejor, primero hagan el grande y luego hacen los otros dos.

Después doblar el papel de abajo hacia arriba hasta donde está la línea

Luego doblar de arriba hacia abajo para obtener la siguiente forma:

Abrir el cuadrado y girarlo, y volver a marcar nuestra línea de referencia. A partir de aquí volvemos repetir los pasos realizados anteriormente. (la foto de abajo les servirá de ayuda para saber cómo colocar el papel ya que se ve el marcado que hicimos antes)

Paso 4:
Después de doblar nuevamente debemos obtener un cuadrado dividido el 9 cuadritos.
El siguiente paso es recortar los cuadrantes 1, 3, 7 y 9 para obtener la forma de una cruz.
No tiren los cuadrantes restantes ya que luego nos pueden servir para scrapear nuestra Exploding box.
Después de doblar nuevamente debemos obtener un cuadrado dividido el 9 cuadritos.
El siguiente paso es recortar los cuadrantes 1, 3, 7 y 9 para obtener la forma de una cruz.
No tiren los cuadrantes restantes ya que luego nos pueden servir para scrapear nuestra Exploding box.

Este es el resultado después de doblar y recortar, tenemos 3 cruces de 3 diferentes tamaños, que están listas para ser scrapeadas… recuerden chalkearlas… jejejeje ya sé que les encantaaaaaaaaa

Este es el resultado de las cruces Scrapeadas y listas para pegar, como pueden ver el cuadrante 5 de la cruz grande y de la mediana están vacíos.

RESULTADO FINAL DESPUÉS DE PEGAR LAS CRUCES!


1- Hacer un cuadrado de 12x12 cm.

2- Luego debemos marcar a dos centímetros de cada lado de la caja para poder doblar e ir dando forma de caja.

3-A continuación se deben meter las puntas hacia dentro para darle forma cuadrada.

4-Después con mucho cuidado pegamos esas puntas en paredes de la tapa y así nos queda nuestra tapa.


 This box is very simple to make, and can be made either square or rectangular. The lid and base are constructed in exactly the same way. The first part of the instructions covering how to calculate the size of card to cut, takes far longer to explain than to do! Click on any of the photos for a closer look.
First of all, you need to measure the envelopes for the cards you will be putting into the box. Add on 0.5 or 1 cm to both the length and width of the measurement, depending on how thick the card is, and how much space you want around the envelopes. This box was made from Stampin' Up Whisper White, which is a thinner card, and I added on 0.5cm. For thicker card I would use an extra 1cm. Then you need to decide how deep you want the box to be. To do this, I stacked up the cards and envelopes and measured the height of the pile, rounding up to the nearest half cm. So now you have the measurements you need to calculate the size of the piece of card to work with.
My envelopes measure 8cm x 8cm, and the stack measured a little under 3cm. This is the calculation I did:
In the diagram below A = width of the envelope + 0.5cm i.e. 8 + 0.5 = 8.5cm
B = length of the envelope + 0.5cm i.e. 8 + 0.5 = 8.5cm
C = height of the stack of cards and envelopes rounded up to next half cm i.e. 3cm
So to calculate the size of the piece of card needed for the base of the box I did
Width C +C + A + C + C or 3 + 3 + 8.5 + 3 + 3 = 20.5cm
Length C + C + B + C + C or 3 + 3 + 8.5 + 3 + 3 = 20.5cm
Then the size of card for the lid just needs to be an extra half cm overall ie
Width 20.5 + 0.5 = 21cm
Length 20.5 + 0.5 = 21cm
So once you have done your calculations, cut out the two pieces of card to those measurements. In my case one piece 20.5cm x 20.5cm and the other 21cm x 21cm. Do the following with both pieces of card.
Measure in from each corner the height of the box (3cm for my box) and then the same amount again. Do this on all sides. Score at these measurements as shown in the photo. The extra half cm for the lid will end up allocated to the centre, which is where you need it to be.
 Cut along the score lines to remove each corner as shown.
 Fold and crease along each scoreline. Flatten the card back out, then score diagonally across all of the small corner squares as in the picture below.
 Put double sided tape on the four edges - here I have used Stampin' Up's tape as it is a nice strong one.
 Remove the covering strip from the tape, and fold in the flaps on two opposite sides, sticking them down. Doesn't matter which sides, as long as they are opposite each other.
 Take one of the corners and fold in as shown.
 Now fold back along the diagonal score line and press along the fold to crease well. Make sure as you do this that the fold is falling so that the corner will be nice and square. Now is the time to make any adjustments to the folds to ensure squareness. Worth taking some time here to get a good finished result.
 Do the same on the other side of that edge. You need to end up with two triangles pointing towards each other on the side like this.
 Remove the cover strip from the tape, and fold the flap over to cover the triangles. Press down firmly to stick in place. Do the same on the other side of the base.
 Will look like this when it's finished - nice and neat.
 Nice and neat on the outside too - with no 'raw' edges.
 Repeat with the piece for the lid. The double thickness on the sides gives a nice sturdy finish to the box, even when thinner card is used.
 Decorate the outside of the box to match the cards within.
 ******
A note from Julie
Thank you so much Joanne for another wonderful tutorial this is fantastic!!
Everybody go and visit Joanne's Mainly Flowers blog HERE she is so talented!
 Here it is girls .. The video tutorial on the Shadow box .. If for some reason you are unable to open up and view this video I have done a written tutorial back in 2006 which can be viewed HERE
 Okey dokey then...SO since its a FABULOUS FRIDAY and all... SO I wanted to give you a treat with posting twice to get you ready for your stampin fun weekend ..
 soo with out further a do... Here is my Pictorial directions for my shadow box Just click on image to enlarge your viewing ( I didnt want to take so much space up with larger uploads ( sorry )


Ok lets get to making those shadow boxes everyone ..
Until later .. Happy Stampin
So, as promised here is a tutorial to make not only the ferrero rocher gift, but an easy way to adjust the box to suit your needs!
You will need;
a 4x4 piece of Stampin' Up! Designer paper
a piece of Stampin up Card 38mmx210mm
Clear Embossing Powder
Heat Gun
Ink & versamark
Brad and punched flower or Ribbon
X1 Ferrero Rocher Sweet
Pencil
Ruler
Bone folder
Sponge daubers
No adhesive is required for this project!

With your 4x4 piece of paper, pattern side down, draw an X in the centre by using the ruler from point to point, dont press too hard, you dont want this to show through.

Fold each corner into the centre, use a bone folder for crisp folds.

Now fold each straight edge into the centre and again use a bone folder.

open up 2 opposite sides, and make straight cuts where shown.

Now fold up the sides with the 'flaps' attached, and fold the flaps in, Bring the smaller sides over the flaps and flatten everything down into the centre. Your origami box is now complete!


Take your 38mmx210mm strip of card, score it at 124mm, turn it around, and repeat. Now score 1cm from one end, and cut 1cm from the other. it will look like this;


Stamp your required design in versamark onto the larger parts of this piece, use a post it note to mask the base, apply embossing powder and heat to melt.


Sponge on ink using a dauber in a colour that will complement your origami box, the embossed areas will resist this ink and the stamped pattern will be visible as the original card colour.


Fold the smaller side up and under the flap scored on the wrap, using a hole punch, punch one hole for the brad/flower or 2 holes for the ribbon, attach whichever fastener you are using to the piece and arrange it. Slide your origami box in to complete the piece and add a tag if required!


This little Easter Treat Box is one that I custom designed. It was inspired by a circle card that we learned how to make at Stampin’ Up!’s Leadership Convention. I started with their basic design and altered it into a 3 dimensional box. You can see a side view of the box below:

Supplies used for this project:
- Stamps: A Good Egg
- Ink: Black Staz On, Basic Black Stampin’ Spot (you could use a Black Stampin’ Write Marker), So Saffron and Pumkin Pie Classic Ink, So Saffron and Going Gray WWC (watercolor wonder crayon)
- Paper: 12" x 12" So Saffron CS, 1 1/2" x 11" piece of Chocolate Chip CS, 1" x 11" piece of Bashful Blue CS, scraps of Whisper White CS and Chocolate Chip CS
- Accessories: 8" piece and a 6" piece of wide chocolate chip grosgrain ribbon, On Board Ginormous Pieces Chipboard – the largest circle was punched out and the "frame" used as a template, corner rounder punch with the guard removed, stamp-a-ma-jig, blender pen, personal paper trimmer with scoring blade, medium cello bag, Stampin’ Dimensionals, paper snips, white Signo Gel Pen, paper crimper, bone folder
You can access the template HERE.
Step-by-Step Directions
Step 1: Align the template with the top corner of the 12" x 12" piece of So Saffron CS. Using a pencil, trace the outline of the circle. The diameter of the circle is aobut 8 1/2" so if you don’t have the template shown below, any circle shape or circle cutter that has a circle of approximately the same size will work. Even if the circle is a tad bit smaller or a tad bit bigger the project will still work.

Step 2: Cut out the circle along the pencil lines. Line it up with your grid paper as shown and using a ruler if necessary, make a pencil line on the left and right sides of the circle at 3" and at 3 1/2" as shown.

Step 3: Line up the pencil marks with the channels on your personal paper trimmer and score all the way across the circle along both the 3" mark and then the 3 1/2" marks.

Step 4: Fold along the 3" score line (using your bone folder) , then line up the fold along the top edge of the personal paper trimmer. You are going to score at: 1 5/8", 2 1/8", 6 3/8" and 6 7/8". **Note: when you are aligning your folded circle, you are NOT lining up the largest part of the circle with these dimensions – you are lining up the very top left corner of the fold.

Step 5: Crease along all the score lines using your bone folder. Your template will look like this:

Step 6: Using your paper snips, cut out the two smaller pieces of the circle, following the innermost (towards the center of the circle) score lines.

Step 7: Flip the circle over. Stamp the small flower stamp all over the back of the circle using So Saffron ink. Color in the center of each small flower using a white signo gel pen.

Step 8: Flip the template back over, fold in the side flaps, add sticky strip along the left and right edges of the bottom flap as shown in the picture.

Step 9: Peel of the backing from the sticky strip and carefully bring up the bottom flap and align and stick onto the side flaps so that the box looks as shown. I found it easier to peel of the backing and stick one side at a time.

Step 10: Take your 1 1/2" x 11" strip of Chocolate Chip CS and score and fold at 1 3/4". Lay this fold over the front right edge of the box, and using your fingers carefully shape the belly band around the creases. Do this one crease at a time by gently pinching the CS over the crease to get an "impression" of the crease. After each crease, remove the belly band, place it onto the grid paper and fully crease as shown in Step 11.

Step 11: Each time you crease the areas that you pinched, make sure that the sides of the CS strip are aligned, this will ensure your crease line is straight.

Step 12: Once you have finished going over step 10 and 11 for each crease, use your corner rounder punch to create a scalloped edge on each side of the CS strip. If you’ve never used your corner rounder to create a scalloped edge click HERE to see a tutorial that was created by Beate Johns.

Step 13: You will be overlapping the ends on the backside of the box. Notice from the picture below, that if you were to do that right now, you would see where the scallops do not quite match up. The next step will help you solve that problem. Before you move on though, take a pencil and make a small mark on the top and bottom right where the flap overlaps. ends.

Step 14: Take your paper snips and cut away the scallops from the bottom flap as shown in the picture.

Step 15: Attach the belly band. As you can see, now when you overlap the flaps, you no longer see the mis-matched scalloped edges. Use your snips to tidy it up a little if you need to.

Step 16: This is what the front of the box now looks like.

Step 17: Take your 1" x 11" strip of Bashful Blue CS, score and fold it at 1 3/4", and then shape it around the box, the same way you did the chocolate chip belly band.

Step 18: Once you’ve creased and folded your belly band so that is fits around the box, remove it and on the longer end, stamp "happy easter" just to the left of the score line. Use your Stamp-a-ma-jig if nessary. Mount the band so that it is centered in the chocolate chip band. This time though, the "seam" where the two ends overlap will end up on the front right side of the box. This seam will be covered by the ribbon.

Step 19: Take some Chocolate Chip CS scraps and run them through a crimper. Using a paper trimmer or the SU table top cutter, cut them into very thin strips. Crunch up the strips and gently rub them between your palms. This will become the filler for your treat box.

Step 20: Tie your 8" piece of ribbon around the Bashful Blue CS strip – position it so that it covers where the ends overlap – and tie in a knot. Stamp, color and cut out your chick and the half egg shell and mount.
Fill your medium cello bag with your treats -remember the box is only 1/2" deep so the treats have to lay relatively flat. Tie the cello bag shut with the 6" piece of ribbon tied ina knot. Place a little tissue on the inside bottom of the box for "padding", insert your treat then stuff a little filler along both sides. You’re done!
 As promised...here is a paper box tutorial comin' at ya!
 O.k, so here is how I make the boxes that my little soft shoes come in. This tutorial is a slight variation of one that I found online. The difference: this one gives you a CLEAN box top with no creases. Other tutorials produce a box that has fold creases running from corner to corner. (a visible "x" on the top of your box. ewww!) The perfectionist in me can not cope with that! So here it goes...
You'll need:
Ruler
Pencil
12" x 12" square of paper (box top)
11.75" x 11.75" square of paper (box bottom)
Finished box will measure: 4" x 4"
Ruler
Pencil
12" x 12" square of paper (box top)
11.75" x 11.75" square of paper (box bottom)
Finished box will measure: 4" x 4"

1. Place your paper wrong side up. Start by using a simple trick learned in middle school geometry. (and you thought you'd never use that stuff!) Place your ruler diagonally from corner to corner and mark a pencil line in what seems to be the middle of the ruler. (eyeball it) Do this again from the other corners. Where the two pencil marks form an "x" is the middle of your piece of paper. TIP: If you mark the "x" lightly, you can erase it later so as not to be seen.

2. Fold each corner of your paper up so that the point meets the center of the "x". After you've folded up all four corners, you can erase the "x" mark if you wish for it not to be seen.
 3. Fold the bottom edge up to the center. Repeat with the top edge as shown above.
 4. Fold the Right edge in to the center. Repeat with the Left edge as shown above.

5. Now unfold the last couple of steps until your paper looks like that above. Fold botom edge up as shown. Place index finger where shown. Keep it here.
 With your other hand fold the left crease inward so that the two edges meet as shown below.
 I hope the picture is worth a thousand words for this step since it's not easy to describe.
 6. Once you fold in the sections on both sides they will look as shown in the top picture above.
Now fold the vertical section down into the box top. This forms one side of the box.
 Repeat steps 5 and 6 with the other side.
7. Wipe the sweat from your brow, 'cuz your box top is complete baby! Pinch your sides in so that they stay down. Pinch at the inner corners to conquer any flaps that will not lay flat.
8. Repeat with the smaller square paper for your box bottom. You are a box-making machine!


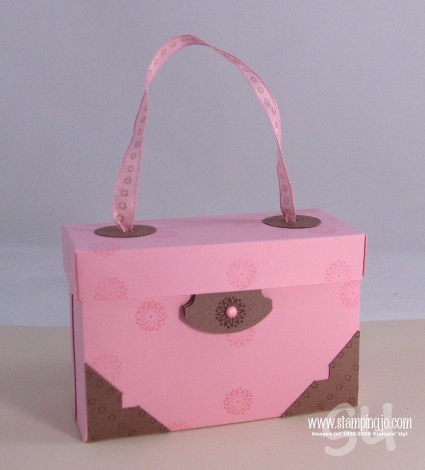
Supplies Needed: (for the stationary box holder and top only)
* 3 pieces of 12x12 cardstock and/or coordinating patterned paper. (In my example, I used only
patterned papers from the Art Freckles kit.)
* Paper Trimmer with trimming AND scoring blade
* Scoring bone to crease your folds
* Red sticky double sided tape
* Embellishments to decorate the outside of your Stationary Box. (In my example, all embellishments except for Prima flower are from the Art Freckles kit.)
Additional Supplies Needed: (for set of 4 tags, 4 qty 3x3 cards and 4 qty 4.25 x 5.5 cards)
* 3 sheets of 12x12 cardstock for card and tag bases.
* Additonal patterned papers and embellishments as required to create these items.
NOTE: The cards and tags will NOT be covered in this tutorial.
PART A: Making the Stationary Box Unit
Step #1: Take your first piece of 12 x 12 paper and SCORE IT @ 3 inches and 9 inches.
Step #2: Flip this same piece of 12 x 12 paper around, now SCORE IT @ 5 inches and 7 inches.
Step #3:
 Step 4:
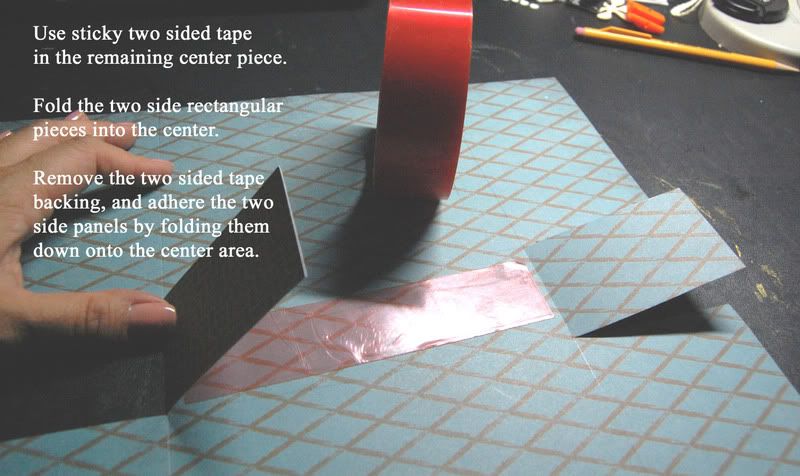 Step 5: fold and glue it down like this.
Step 6:
Step 7:
Step 8:
Step 9:
Step 10:
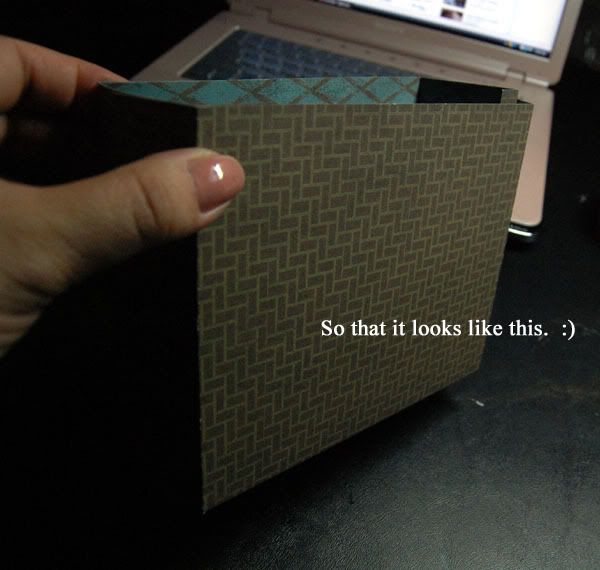
Whoohoo!! If you've gotten this far with me, you've just completed making the outside shell of the Stationary Box!
Whoohoo!! If you've gotten this far with me, you've just completed making the outside shell of the Stationary Box!
PART B: Stationary Box Shelves (there are 3 of them)
Step 1:
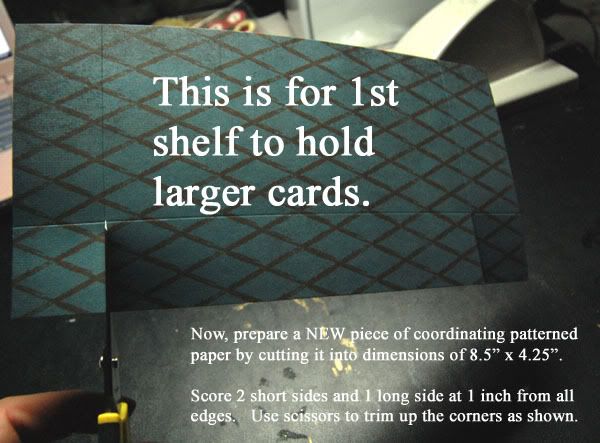
Step 2:
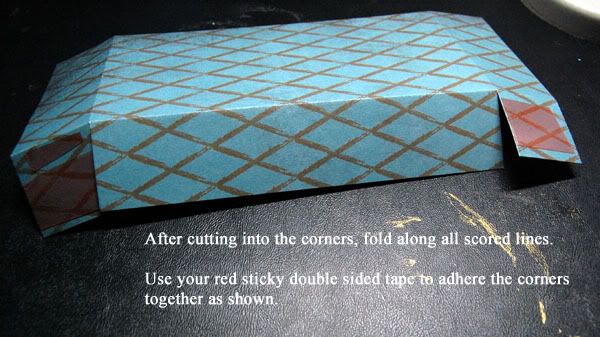
Step 3:
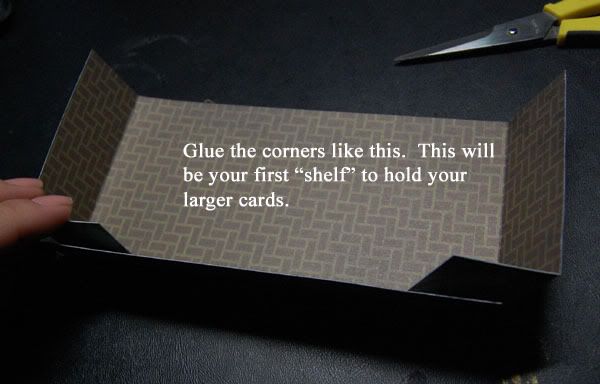
Step 4:
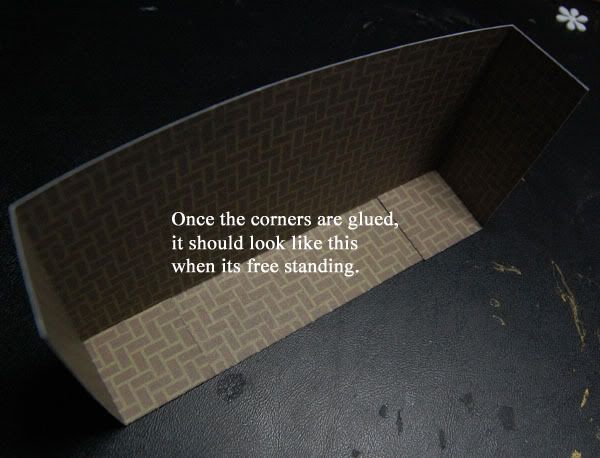
Step 5:
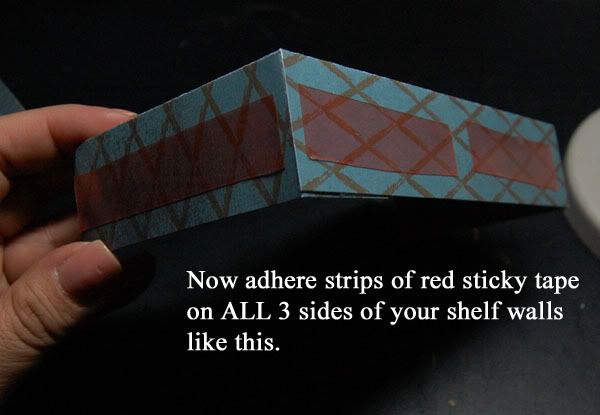
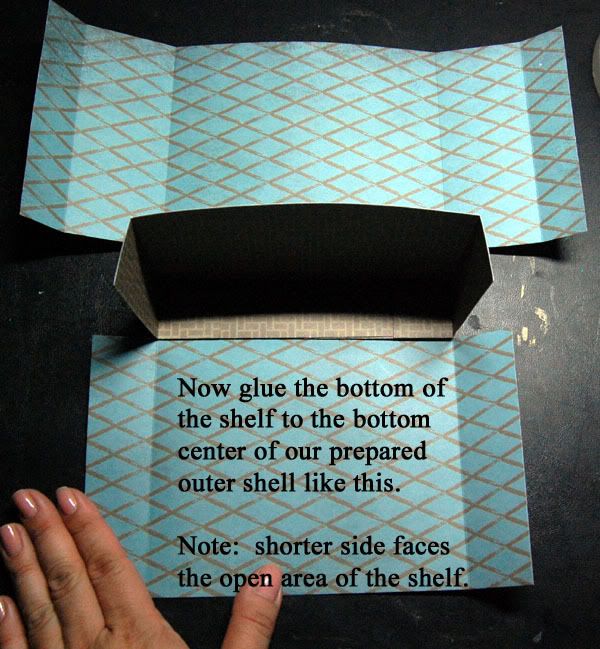
Step 7:
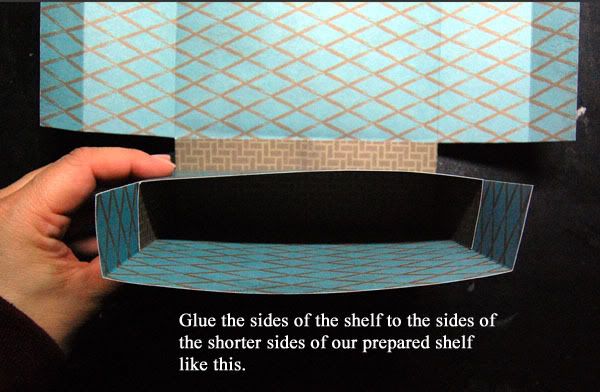
Step 8:

Step 9:

Step 10:
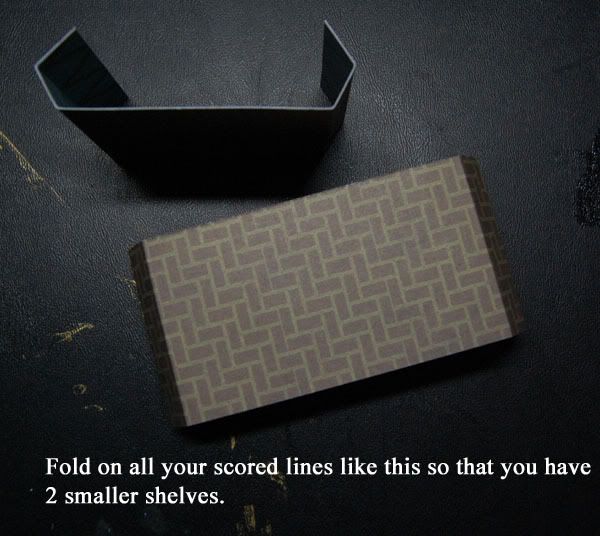
Step 11:
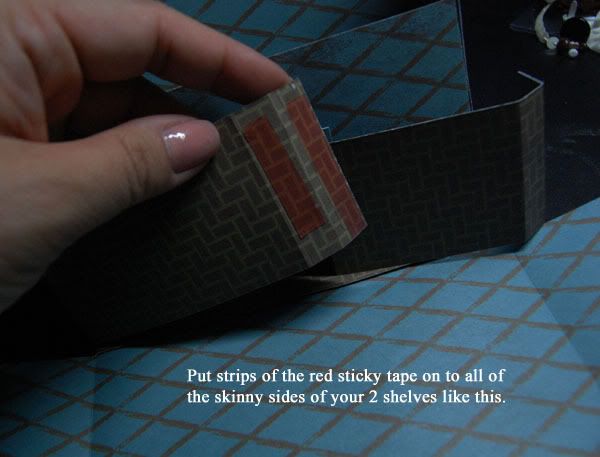
Step 12:
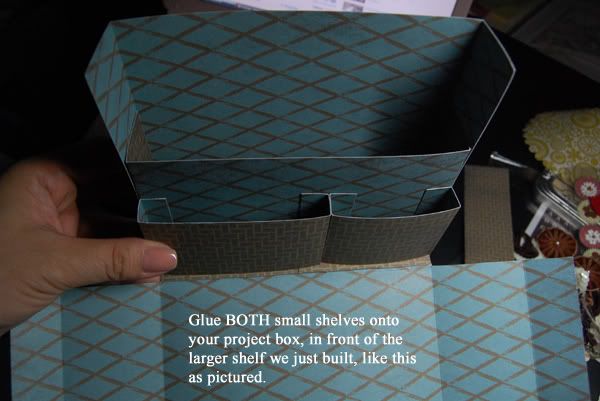
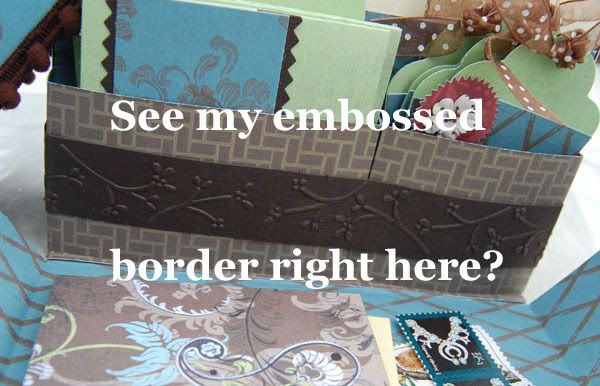
Step 13: I used the branch border from the Just My Type Cuttlebug folder set to emboss a
long length of matching brown cardstock to decorate the front of my shorter "shelves."
(please disregard all the contents in my Stationary box for now.)
Whoohooo! We're almost there to the finish!!
Let's make our Stationary Box top now, shall we?
Let's make our Stationary Box top now, shall we?
PART C: Stationary Box Top
Step 1:
Step 2:
Step 3:
Step 4:
Alrighty, we're at the last stretch. Let's make our inside flap doodads, i.e. post it note holder, stamp holder and pen loop.
Here's what the inside doodads look like to keep you motivated to continue on with our little project. :)
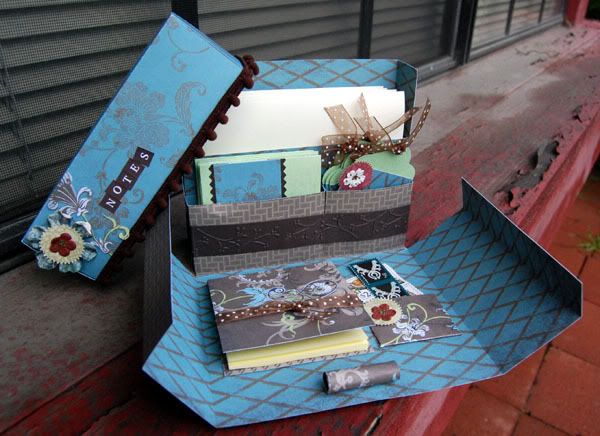
PART D: Inside Doodads
Step 1: Cut into a coordinating piece of cardstock or patterned paper at
3.25 x 6.25 dimensions. Score it in the middle, and put a pad of 3x3
post it notes inside. I decorated the top of my post it note holder with
some ribbon. Glue the covered pad onto the LEFT side of your inside
flap opening of our stationary box.
Step 2:
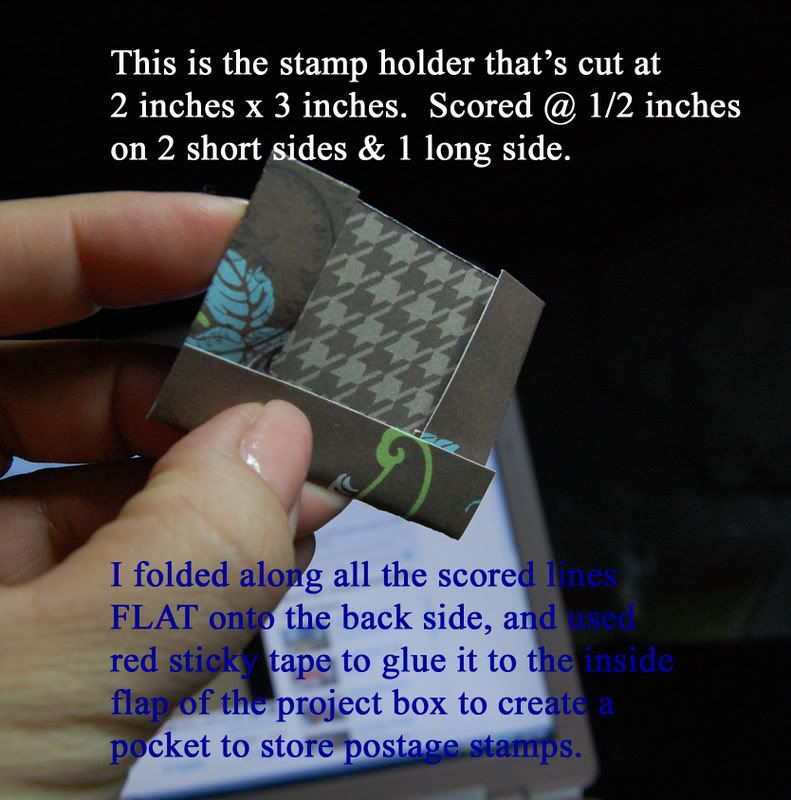
Step 3:
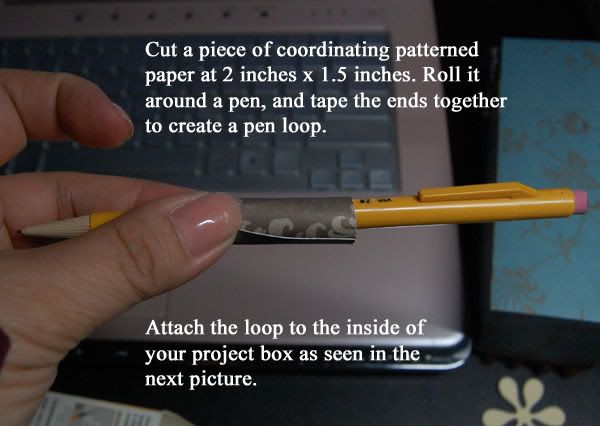
The stamp pocket is glued to the RIGHT side of the flap and the pen loop is glued nearer the bottom of the flap (when open) as pictured.
Yeeaahh!! We're done! Now, please go ahead and make a few 3x3 cards to insert in the LEFT smaller pocket shelf, some embellished tags for the RIGHT smaller pocket shelf, and some 4.25 x 5.5 cards for your larger pocket shelf in the back. You're on your own for these items as they are not a part of this tutorial.
She created a great gift box tutorial using our new paper collection, English Garden. As lots of you are gearing up for graduations and weddings, this beautiful box will come in handy for those special little gifts.
Embellished Gift Box Directions
1. Print and cut out template (print template). Make sure you print in the right orientation so it fits on almost the entire sheet. The dotted lines are for folding and the solid lines are for cutting. Carefully cut out the image. Make sure you cut up the bottom solid line-that will serve as the bottom flaps of the box.
2. Using a pencil, trace your template onto your patterned paper. Marks Paper Company’s double sided paper works great because the inside of the box will be patterned as well. Here you can see I want the purple and white paper as my outside.
3. Do the same cutting that you did on the white template. Remember the solid lines are for cutting and the dotted lines are for folding. Make sure you only cut out the solid lines on your box.
4. Fold your box where the dotted lines would be. You can reference your original white template to get an idea of where to fold. You are going to be folding inward just as I did in the photo below. It should fold quite easily if you cut in all the right places. Make sure you make good creases in your paper in order for the box shape to keep well.
5. Fold your box like the photo below. You are going to fold the outer flap inside the box. Put some glue on the flap and press firmly for it to hold. The creases on the folds should guide you on how to fold your box.
6. Fold the bottom flaps up and glue the last three to each other. Do not put glue on the top of the very first flap because your gift will stick to your box. You can use tape to secure the flaps in place. When finished, embellish as desired. The new die cuts and covered buttons work great for the box!
You are done!
It's true, sometimes plastic canvas gets no respect in the craft world, but it deserves some! It's a fantastic material for all kinds of structural crafts, such as this beautiful needlepoint gift box.
What you'll need:
- 14-count plastic canvas
- Pearl cotton embroidery floss
- Small, blunt, large-eyed needle
- Scissors
- Pencil
- Cardstock
- White craft glue
- Large paper clips
 | Plastic canvas is available in 7 count, 10 count, and 14 count. (The "count" is the number of squares per inch.) |
Plastic canvas comes in several grades: 7 count, 10 count, and 14 count. The count refers to the number of squares in an inch. You've probably seen the 7-count stuff at your craft store, but I'm a big fan of 14 count. Its holes are much smaller, so your stitchery looks much finer.
 | The needlepoint pattern is based on simple squares, so it's easy to size your box up or down. |
This design begins with a simple stitch pattern. I built it on squares, so you can easily adjust the size of your box. But if you prefer, you can stitch any pattern you like onto your box. Take a look at some other interesting needlepoint stitches at Needlepointers.com or About.com.
 | Decide on the overall size of your box, based on the number of pattern repeats. |
Decide on the width and length of your finished box, using the pattern as a guide. I decided to make this one two pattern repeats wide by three repeats long. You could also make it two by two, or four by five, or whatever you like. Then, decide on the height—I'm making my box two pattern repeats tall.
Time to stitch up some canvas! Because 14-count canvas has such tiny holes and they can be difficult to count, I often just do my needlepoint right on the full sheet of canvas and then cut it out afterward.
 | Don't knot the ends of the floss. Instead, catch them in the back of the stitches. |
It's best not to knot your embroidery floss when stitching on plastic canvas—not only will knots make the back of your work bumpy, but they'll also tend to pop right through the canvas. So instead, begin stitching the pattern by bringing the needle up through the canvas and leaving about a 3/4-inch tail of floss on the back side. Flatten this tail with your finger so it lies perpendicular to the direction you'll be stitching. Then, catch it under the stitches, as shown here.
 | To end a strand of floss, pass the needle under the back side of several stitches. |
When you finish stitching with a strand of floss, just pass the needle under several stitches on the back of the work, and cut away the excess. As you stitch the pattern, begin and end each color this way.
 | To make the bottom half of the box, you'll need a bottom piece and four sides. |
Here are the pieces you need for the bottom of the box: one base and four sides. Notice that I stitched the base with a much simpler pattern since it's not going to be too visible in the finished box. Also notice that the edges of these pieces are left unstitched. We'll cover them up later.
 | Cut the top of the lid one square longer and one square wider than the bottom of the box. |
Now you need to stitch up some pieces for the lid of your box. But here's an important note: The lid pieces need to be slightly larger than the box pieces. If you make them the same size, the lid won't fit over the box! So what I do is this: I cut the canvas for the top of the lid so it measures one square wider and one square longer than the bottom of the box. Then, I cut the side pieces of the lid to match.
 | Add a row of continental (or basic needlepoint) stitch around the pattern on the lid to accommodate its larger size. |
One thing to notice here: Since the top of the lid is one row larger than the bottom, my stitching pattern needs a little tweak so it will fit nicely. I just did a row of continental stitch all the way around the lid and then filled in the pattern.
 | Join the pieces together with a whipstitch, catching the loose end in the stitches. |
Okay, with all 10 pieces stitched, you're ready to assemble your box. I like to use a doubled strand of pearl cotton floss to join the pieces—it covers the edges more completely.
Begin with the bottom half of the box. Put one side piece and the base piece together as shown above, wrong sides together. Then, pass the needle up through the base piece. Pull the floss through until you have about a 1-inch tail on the back.
Lay this tail along the middle of the two pieces. Then, use a whipstitch to sew the pieces together. See how you catch that loose end in the back of the whipstitch as you go?
 | Attach all four sides to the bottom, then trace the resulting shape onto cardstock. |
Join all the side pieces to the base piece, making sure the stitch pattern lines up the way you want it to. When this step is completed, trace this shape onto a piece of cardstock. Set the cardstock aside for a moment.
 | Whipstitch the sides together to form the box. |
 | Make the lid of the box, and remember to trace it onto cardstock before sewing up the sides. |
Repeat these steps to assemble the lid of your box. Don't forget the cardstock step!
 | Whipstitch around the top edge of each piece. |
Finish off the remaining edges of the two pieces with a whipstitch. For this step, I like to use a single strand of floss rather than the double strand I use to join pieces.
 | The cardstock shapes you traced earlier will become a lining for the box. |
That cardstock you traced earlier will now become a lining for your box, covering up the wrong side of your needlepoint. Begin by cutting the shapes out with scissors, cutting about 1/8 inch inside your traced lines. Fold the sides up as shown.
Next, slip the lining into the box. If you need to, remove it again and adjust the folds and trim any edges you need to in order to make it fit better. The lining should fit snugly inside the box. (Incidentally, when I make larger plastic canvas boxes, I usually sew up a fabric liner.)
 | Anchor the lining with craft glue. |
Apply some craft glue to the edges of the lining where they'll come in contact with the box. Remember that the glue can easily ooze right through the canvas, so don't use too much!
 | Secure the liner with paper clips until the glue dries. |

I hope all my readers have had a chance to do some blog hopping. It's been so much fun to see all the new products and fabulous artwork. I'm still working my way through the list, enjoying the journey. If you haven't tried out "the hop", start here.
As promised, the tutorial on the card box shown in my previous post. This tutorial will show you how to make the card box only, I'll have another tutorial on how to make the quick and simple cards at a later date. You can combine the two tutorials and whip up a quick gift anytime you need something special and homemade but you're short on time.
The materials you'll need for the box are:
Two pieces of cardstock, cut to 8"x9"
Paper trimmer
Dry embossing stylus or scoring tool for your paper trimmer
Closure options: Buttons or brads, hemp or waxy flax (see below for other closure options)
Adhesive
Corner rounder
Score your two pieces of cardstock as shown. Note: The picture looks a little off, since it's taken at an angle. Yes, the width is 9" and the height is 8", it just looks taller in the photo.

Cut and remove the portions shaded grey.

Fold all score lines inward.

Round the corners on the larger flap.

Round the top corners on the side flaps. To reach the flap with your corner rounding tool, fold down the wider top flap as shown.

Done with the corner rounding. Both of your pieces should look like this:

Stamp your cardstock, make it pretty. If you're working with pre-printed cardstock, you can skip this step.

Attach the two pieces together by overlapping one flap with the other. Don't skimp on adhesive, you want the spine to hold together.

Reinforce the inside by attaching two small pieces of cardstock in the narrow outer folds, as shown. I'm using green cardstock for visibility, however, you should use the same color as your card box.

Poke a small hole through the center of each side, through the reinforcement, as shown.

Through one hole, affix a large brad. You can substitute a button, if you want.

Tie a large knot in the end of a piece of waxy flax or hemp. Thread through the remaining hole on your card box. The knot inside will keep the cord from pulling out. If needed, you can secure it with a piece of tape or glue, the inside won't show. You can trim the cord later, so leave it a little long right now.

Insert another brad through the hole with the cord.

Apply adhesive along the shorter sides of the longer flap. I like to use a runner adhesive, like Tombow, because it's less messy. For strength, add a single dot of liquid glue or a glue dot in the corner of each flap.

Fold in the flaps, pressing the adhesive into place.

To close the box, wind the cord between the two brads. For another option to the brad and cord closure, you can substitute a ribbon tie, or use velcro stick-on dots.

Leave the box plain, or you can decorate the front.

Christmas Origami Box

 I’ve created a video tutorial to show how to make the Triangle Box shown above. It is not a complicated box but the video does take more than several minutes. I did not know that YouTube had a 10 minute limit so the tutorial had to be broken up into two parts. You can see the FIRST part here:
You can see the SECOND part here:
For those who are curious, I used Cricut paper to make the larger boxes. This paper is 12" tall by 24" wide. I cut my paper down to 12" tall by 18" wide. You can see that paper pack HERE.
Ever since I made the first ribbon storage box to mimic this box from Oriental Trading, I’ve been thinking about how hard I looked for a good tutorial on the subject. I can’t promise that my tutorial will be “good”, but I’ll show you what I did.

The first big problem is to find a good sturdy box that will accomodate a good number of ribbon spools I ended
up buying two of these (plus a smaller version of the same box) from IKEA. The great thing about them is that they are sold in packages of two, and they require assembly. Yep, you heard me right, I *LIKE* - in this case - that they weren’t complete on shipment. Here’s why:
 Because they are shipped flat, it’s much easier to mark the holes and insert the eyelets. But don’t let that discourage you. Any sturdy cardboard box would work.
The first step is, then to mark where you want the holes. I found that because I could put two rows of ribbon in the box, that I wanted lots of holes to poke it through. So I created this layout. 5 large eyelets on the bottom row, and 8 smaller ones on the top. I just drew two horizontal lines where I wanted each row to be and then evenly spaced each hole. (On this go round, I just opened the box I had completed already and traced the holes locations.)
 During my first attempt, I cut each hole by hand with an Exacto knife. That proved to be really hard as this is some seriously thick cardboard. So this time around, I asked my hubster to try using the drill. Ahhh… I saved the aching in my hands and ended up with much cleaner holes! Each hole he drilled was just a tiny bit bigger than the opening in the eyelet.
Next, just insert the eyelets. The large and small follow a similar process, but follow the instructions on your eyelet kits.
 And voila! Your own neat ribbon storage! You can see that even with the extra holes I still needed to thread 2 ribbons through some. So far, that seems to be working ok. And it’s really easy to see what I have, and actually USE it because it’s easy to get to.
Now, does anyone know what to do with the little “bobbins of ribbon”? I have a million of those too!!!
No hay comentarios:
Publicar un comentario