

My daughter is the unfortunate owner of very poor eyesight (her prescription is a +5 on the right and a +6 on the left) and also a squint, both are corrected by wearing glasses, which she has done, with very little complaining, since the age of 18 months old (proud Mummy moment!). In addition to all this, we are exercising her weaker eye (the left one), with 2 hours of patching a day. The sticky patches the hospital gave us were, to be honest, useless, and kept peeling off, but why use something like that, when Mum can make one of these... a cute, pink eye patch, out of felt.
I decided to post this as a full tutorial, so many craft bloggers have children, I figured there will be others out there who may find this useful.
You will need - light pink felt, dark pink felt, yellow felt, black felt, a button, embroidery thread, pins, a needle, and a pair of scissors, and of course, ...some glasses!
Print out the templates so that the basic eye patch shape is roughly 7 x 10 cm, and the flower is 5 cm wide.


Cut the patch template, making the 3 slits as indicated. Fold the end over, as below, and sew down both seems (I have done this on the machine, but you could stitch it by hand), trim off the excess felt.

Pin together the 2 edges of the center slit, trapping the folded over arm holder loop in between, and sew.

Trim off any excess felt from this inner seam and turn the patch the right way round. Try it on the glasses for size, and also trim the outside edges if needed (probably a good idea at this stage to get the person who will be wearing the patch to try it on to check the fit)

Pin the lense sleeve into position,

and sew on with random straight stitches along both the top and the bottom edges, leaving both side open for the glasses frame to slip through.

Repeat the basic patch shape in black felt, remember to sew it the reverse way round this time, as the 2 need to fit together with all seams on the inside. Place the black inner patch, and the outer patch together and trim any excess off the black so they both match and blanket stitch both pieces together, all the way round the edge.

Attach the flower decoration using the button by sewing onto the lense sleeve, be careful not to sew it on through the whole patch, and just to the sleeve, other wise it will block the gap the glasses frame is to slip through . Place the patch on the glasses, and using some sharp scissors, poke a small hole through the whole patch, for the nose pad to slot through.

The patch can be used on either the left or the right side of the glasses simply by turning it upside down, Lucy's goes on the right, covering up her good eye, so she is forced to use her left one. This is the girly version, you could easily make a boy's version by using red and blue felt, and decorate it with a star sheriff's badge, or a bug shape.
No doubt, in the future, I will be making more of these as Luke also has a slight squint, and it's best to catch these things early, that's when patching has the most effect.
fuente
http://lucykatecrafts.blogspot.com/2008/02/eye-patch-tutorial.htmlI can finally use up all those SCRAPS!
This is really, really easy, and I request right off the top that you yoink this, make these, sell these, and do whatever you can to make having to wear an eye-patch less depressing and more comfortable for people (including children) who MUST wear them. I made these, and about a dozen others in different colours, for a neighbour of mine who survived the kind of stroke that kills or severely incapacitates just about everyone else. One of her eyes is fixed and dilated, and as a result, she cannot switch on the lights in her house without covering the "dead" eye. She asked me to make her some eye-patches that weren't black vinyl, but wouldn't press against her eyeball, or drown her in sweat in the summer, or basically make her look like a pirate or a crook.
You need:
- paper-backed fusible web (e.g. Heat-n-Bond or Steam-a-Seam)
- Cotton, or other breathable fabric that can be ironed on the "cotton" setting; scraps should be at least 4"x3"
- buckram interfacing (stiff stuff, but not too stiff, and definitely do not use heavy non-woven!)
- stretchy fabric for binding (I used spandex) cut in 1-1/2" wide strip of about 7" length
- 1/4" elastic band, black
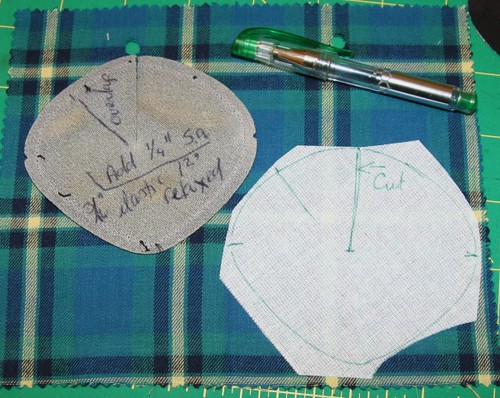 OK, first you obtain an eye-patch to take apart and use as a template. :-) They're really cheap at the drug store - my neighbour gave me one of hers with a stretched-out elastic band. Damn, it's ugly. You need only the patch part. Take a look at my notes (but don't look at the "add 1/4" s.a." - I wrote that before I had decided whether to overcast the edge, line it with raw edges turned inside, or bind it). See the notches in the side: that's where the elastic gets stitched. The line denotes the overlap to create a cone .
Next, fuse your paper-backed web to your buckram. That's the white stuff you see on the plaid there. Fuse the buckram to the WRONG side of your "show" fabric - the fabric that will be on the outside of the eye-patch.
Trace your eye-patch template, and mark your elastic placement, the slit, and the overlap line. I used gel-pen ink because it wouldn't soak through to the right side of the fabric, but I could still see the dots in the buckram at the edge of the piece.
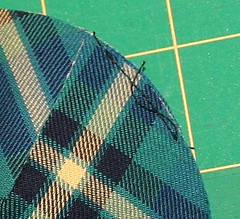
Cut out your eye-patch, and cut from the top to the centre dot along the cutting line. There will be some loose threads along the slit - you just snip those off. They won't fray much because the fabric has been fused to the buckram, and you want to add as little bulk to the eye-patch as possible.
You may want to skip the next step if you're not going for total "black-out" conditions. My neighbour with the dead eye needs to block out ALL light, so I lined her eye-patches with dark fabric.
<--- Fuse more paper-backed web to your lining fabric. It's not essential to have complete coverage here, and this is an excellent way to use up all those little scraps of that somewhat costly web that my projects eat up all the time. (I can't seem to throw away anything larger than 1"x1"... it just seems wrong.)
 ---> Trace your eye-patch onto the paper-backed web. You don't need to transfer any markings. Cut out your eye-patch shape, peel the paper off, and fuse it to the WRONG side of the "show" part. (That would be the buckram with the writing on it.)
<--- See the slit? Snip the backing fabric there. I used a black eye-patch for better contrast in the image. Once the fabric has been snipped, you should be able to overlap the the edges to make a cone. The overlap was about 1" for this eye-patch.
 ---> Stitch close to the edge. You want to be able to hide this basting in the binding, which is applied last.
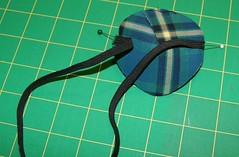
<--- Cut your elastic band the length you need to comfortably wear the eye-patch, if it's for yourself. My neighbour required about 16" for comfort - most patches she bought in the drug store had a 12" to 14" band, which was too tight and would crumple the vinyl against her face. Since she can't blink that eye reflexively, either; this has caused serious discomfort as her eye-patch rubbed her eye-ball.
Position the elastic ends on the sides, raw edges together, making sure the elastic band is not twisted. Now, if you know which eye you're covering with this patch, you can move the "nose-side" end of the elastic 1/4" or so towards the top of the patch, so it will cross the forehead over the other side's eyebrow. If you're just making them for general sale, make them symmetrical, or make "lefty" and "righty" versions. You can't move the "ear-side" elastic away from its corner, or the eye-patch will ride up and let in light, or otherwise not protect the eye it's covering.
<--- These are your Spandex binding strips. Note the diagonal seams. Diagonal seaming is a quilting trick to camouflage the joins in borders and binding - and when they're in fold-over binding, they reduce the bulk of the seam. Take a look at pre-packaged bias tape: it has diagonal seams, too.
The easy way to do this: cut a strip 1-1/2" wide by 7" long. Fold the short ends together. Turn the top 90 degrees, so you have a teardrop-shaped loop, and stitch from top left corner to bottom right. Use a really SHORT stitch length to prevent ravelling. Trim your seam allowance pretty close to the stitches (you'll have two triangles of fabric to discard. YES, DISCARD. They're not worth keeping. Trust me.)
Now, it helps to have a quilting ruler and rotary cutter here: lay your strip flat on the table, make sure the edges are even, and cut that sucker in half lengthwise, to make TWO rings 3/4" wide each. If you don't have a rotary cutter, just eyeball it as "half" as you can. The edges don't fray, so you don't need to do any more folding or finishing.
 <--- Pin your binding to the eyepatch edge with the seam allowance tucked invisibly to the wrong side, and somewhere discreet (I like the lower "ear-side" part of the patch). It's stretchy enough that you can get away with just a couple of pins, and let tension hold it on. Try to keep the binding even on the "show" side, and let the excess go on the back. We'll deal with that last.
Note how I've loosely knotted the elastic band to keep it out of the way, and inverted the eye-patch to make it easier to sew. These things are somewhat reversible - that's why I like to line them!
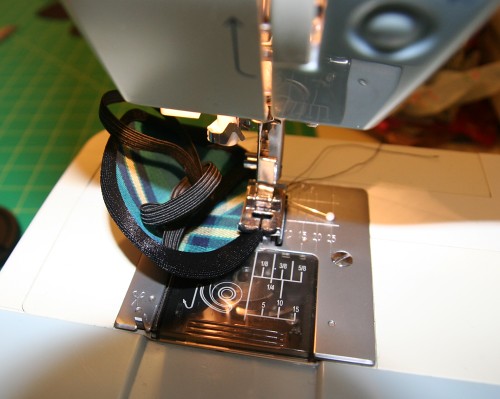
With your needle in the left position, straight-stitch around the edge of the binding.
Go around AGAIN, using a zig-zag stitch a little less wide than the binding itself. (It's an extra step to make sure you've stitched down the binding on both sides - and I like the way it looks.)
When you reach your starting point again, switch back to the left-side straight stitch, and lock down your threads with a few almost-buttonhole-sized stitches. No need to back-stitch if you do this. Cut your threads as close to the fabric as you can on both sides.
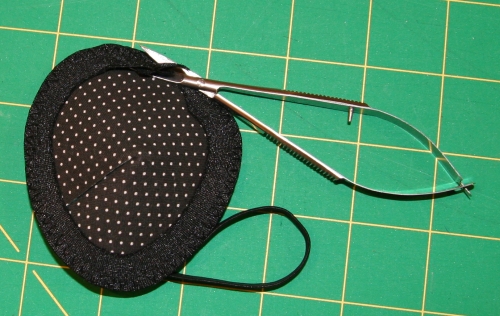 <--- Last step: trim the excess binding fabric from the lining of your eye-patch, as close to the straight stitching as possible. I've got "thread snips" designed to cut threads flush with the surface of the fabric - they're great for close work like this, too. The pointier and sharper your shears, however, the closer you will get to the stitching.
TA-DA! One eye-patch!
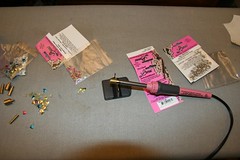
I used the l'Orna fusible beads and bead iron to embellish the eye-patches for St. Patrick's Day. :-)
I don't recommend using anything that will pierce all the layers of the fabric, such as rivets or studs. This thing is going over an eye, after all.
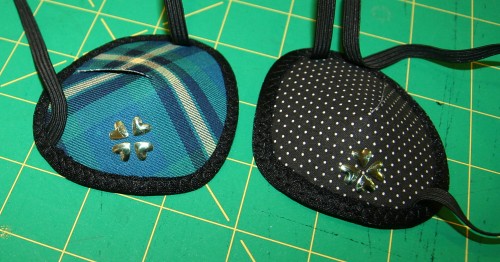
Note that I've made a "righty" with the plaid, and a "lefty" with the polka-dot patches.
The fabric is stiff enough to avoid crumpling under some tension, but it doesn't quite sit under eye-glasses. My neighbour tells me the patches I've made for her are very comfortable, and very breathable. Since we live in Southern Ontario, she hasn't yet test-driven their summertime "sweatability".
I'm not sure yet how WASHABLE they are, but I imagine you can just gently rub some detergent or soap on them with your fingers, rinse in the sink, and hang them on your towel rack to dry. I don't know how much the buckram will soften after washing. Those versed in buckram lore are invited to recommend a better stiffener that still breathes; the non-woven medium and heavy interfacings I tried were far too bulky and heavy. I'm hoping to make and sell these decorative eye-patches through a hospital pharmacy, and I want to be sure I'm making something a bajillion times better than the standard black vinyl patches available. (I encourage everyone here to do the same, if the spirit moves you.)
fuente
http://community.livejournal.com/craftgrrl/11413219.htmlwww.cutoutandkeep.net/
No hay comentarios:
Publicar un comentario